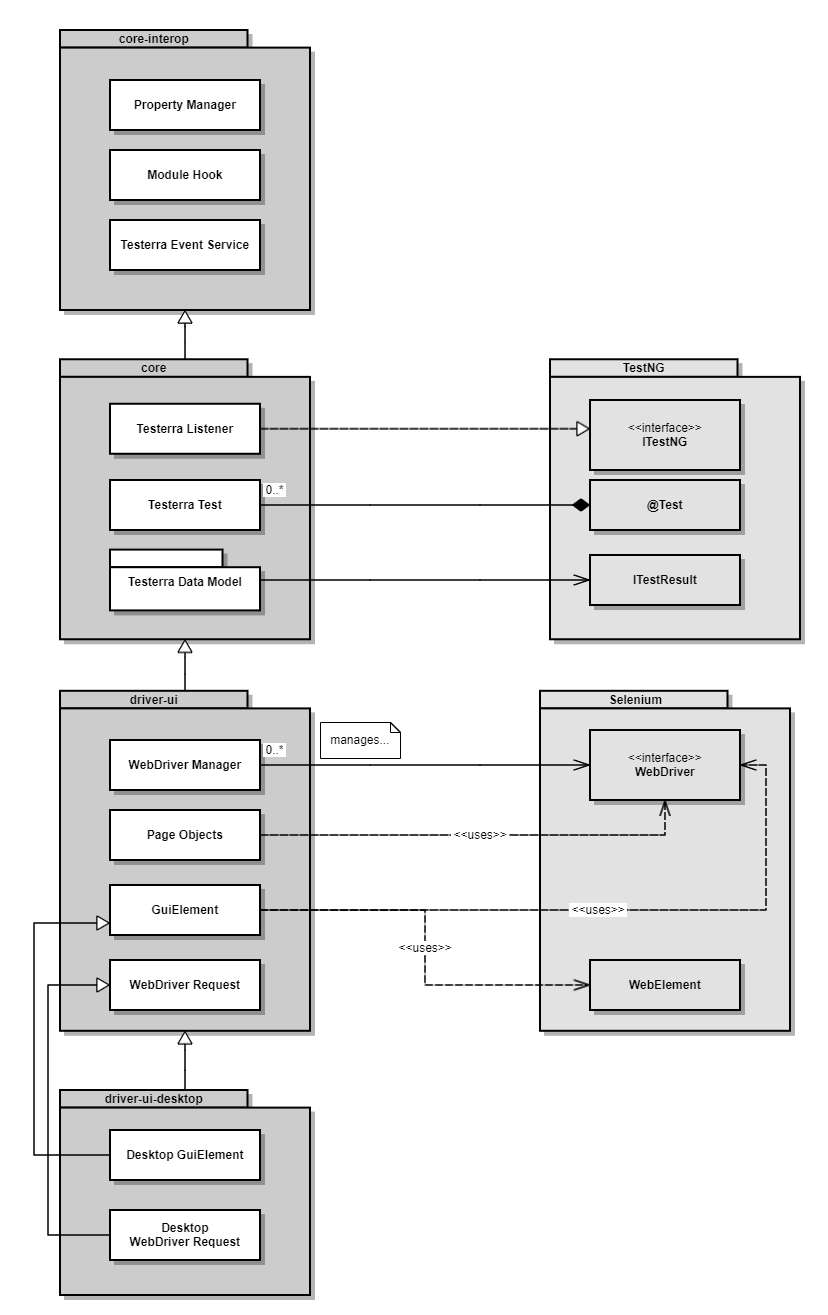
Getting Started
1. Create a new project
1.1. System requirements
-
Testerra is based on Java. You need a JDK 8 or later.
-
Execute your tests with Maven or Gradle
1.2. Testerra Skeleton project
We provide a skeleton project to demonstrate the basic features of Testerra.
1.3. Testerra manual setup
1.3.1. Setup
Testerra and all its components are deployed to MavenCentral: https://mvnrepository.com/artifact/io.testerra
For Testerra you need at least the following dependencies.
// build.gradle

apply plugin: 'java'

// Its highly recommended to normalize your project to Unicode
compileJava.options.encoding = 'UTF-8'
compileTestJava.options.encoding = "UTF-8"

dependencies {
    compile 'io.testerra:driver-ui-desktop:1.10'
    compile 'io.testerra:report-ng:1.10'
}<!-- pom.xml -->
<project>
<properties>
<maven.compiler.source>1.8</maven.compiler.source>
<maven.compiler.target>1.8</maven.compiler.target>
<!-- Its highly recommended to normalize your project to Unicode -->
<project.build.sourceEncoding>UTF-8</project.build.sourceEncoding>
</properties>
<dependencies>
<dependency>
<groupId>io.testerra</groupId>
<artifactId>driver-ui-desktop</artifactId>
<version>1.10</version>
</dependency>
<dependency>
<groupId>io.testerra</groupId>
<artifactId>report-ng</artifactId>
<version>1.10</version>
</dependency>
<!-- These dependency are required to get logging to work in Maven -->
<dependency>
<groupId>org.apache.logging.log4j</groupId>
<artifactId>log4j-slf4j18-impl</artifactId>
<version>2.13.2</version>
</dependency>
<dependency>
<groupId>org.apache.logging.log4j</groupId>
<artifactId>log4j-api</artifactId>
<version>2.13.2</version>
</dependency>
<dependency>
<groupId>org.apache.logging.log4j</groupId>
<artifactId>log4j-core</artifactId>
<version>2.13.2</version>
</dependency>
</dependencies>
</project>1.3.2. Create project structure
Your project structure should comply with these simple constraints.
-
src/mainContains all the code for your project like PageObjects, Models and language specific resources. -
src/testContains all test related code like your Tests, Test-Suites, Test-Data and Testerra related setup.
1.3.3. Create test.properties
Create a new file at src/test/resources with the name test.properties.
# Setting the browser
tt.browser.setting=chrome

# Setting the start page
tt.baseurl=http://example.org|
All defined properties can be overwritten later by adding system parameters to your command. (e.a -Dtt.browser.setting=firefox)
|
All supported browsers are listed in WebdriverManager properties
1.3.4. Create Page Class
Now it’s time to create a first simple page class. It should be saved at path src\main\java\<package>. The following example represents the website example.org. It contains one possible link to click and one method to test.
import eu.tsystems.mms.tic.testframework.pageobjects.Page;

public class ExamplePage extends Page {

    @Check
    private GuiElement moreInformationLink =
        new GuiElement(this.getWebDriver(), By.partialLinkText("More information"));

    public ExamplePage(WebDriver driver) {
        super(driver);
    }

    public void clickOnMoreInformation() {
        moreInformationLink.click();
    }
}|
The basic Page class added all the page object functionality of Testerra to your project. See PageObjects chapter for more details. The GuiElement describes the elements like links, buttons, etc. on your page. Learn more about GuiElements in GuiElements. |
1.3.5. Create Test Class and Test Method
The easiest way to create a new test, is by creating a new class in the path of src\test\java\<package> and let it extend from TesterraTest.
If you already have test classes that extend, you can add the TesterraListener manually. Both ways do basically the same.
To stick to the example above, here is a very simple test class which navigates to example.org and clicks on the link defined on the example page. Again, probably imports must be made in IDE.
import eu.tsystems.mms.tic.testframework.testing.TesterraTest;

public class ExampleTest extends TesterraTest {

    @Test
    public void testT01_My_first_test() {
        WebDriver driver = WebDriverManager.getWebDriver();
        ExamplePage examplePage = PageFactory.create(ExamplePage.class, driver);
        examplePage.clickOnMoreInformation();
    }
}|
Be aware of using If you import |
import eu.tsystems.mms.tic.testframework.report.TesterraListener;
import org.testng.annotations.Listeners;

@Listeners(TesterraListener.class)
public class ExampleTest {
}
1.3.6. Setup Selenium
If you don’t have a remote selenium yet, you can easily install it by the package manager of your choice.
choco install selenium selenium-chrome-driverapt-get install chromium-chromedriverbrew install selenium-server-standalone chromedriverRead here, if you want to setup another Selenium configuration.
1.3.7. Setup a test suite
To customize the executing of your tests, you have to create a TestNG suite file suite.xml and locate it at src/test/resources
<!DOCTYPE suite SYSTEM "https://testng.org/testng-1.0.dtd" >
<suite name="Suite1" verbose="1" thread-count="10" configfailurepolicy="continue" parallel="false">
    <test name="Test1" parallel="methods">
        <classes>
            <class name="ExampleTest"/>
        </classes>
    </test>
</suite>
1.3.8. Setup test build target
In order to get tests to work, you need to setup a build target test in your project.
// build.gradle
test {
    useTestNG() {
        suites file('src/test/resources/suite.xml')
    }

    testLogging {
        outputs.upToDateWhen { false }
        showStandardStreams = true
    }

    // Important: Forward all JVM properties like proxy settings to TestNG
    options {
        systemProperties(System.getProperties())
    }

    // basically execution returns "GREEN" (framework exits with exit code > 0 if there were failures)
    ignoreFailures = true
}<!-- pom.xml -->
<project>
<build>
<plugins>
<plugin>
<artifactId>maven-surefire-plugin</artifactId>
<configuration>
<skip>true</skip>
<testFailureIgnore>true</testFailureIgnore>
</configuration>
</plugin>
</plugins>
</build>
<profiles>
<profile>
<id>mySuite</id>
<activation>
<activeByDefault>true</activeByDefault>
</activation>
<build>
<plugins>
<plugin>
<artifactId>maven-surefire-plugin</artifactId>
<configuration>
<skip>false</skip>
<suiteXmlFiles>
<suiteXmlFile>src/test/resources/suite.xml</suiteXmlFile>
</suiteXmlFiles>
</configuration>
</plugin>
</plugins>
</build>
</profile>
</profiles>
</project>1.4. Using a proxy
There are three ways for setting up a proxy for your test run environment.
-
System proxy settings for the build environment (Maven, Gradle), TestNG, JVM and Selenium
-
Browser proxy settings for the SUT, which is done by capabilities as described here Proxy setup
1.4.1. Command line (recommended)
To setup a proxy for the whole system, including the build environment (Maven, Gradle), the JVM and Testerra, the recommended way is to pass it by command line arguments like
gradle test -Dhttps.proxyHost=your-proxy-host.com -Dhttps.proxyPort=80801.4.2. Property file
You can also put your proxy settings to the system Property files with the following content
https.proxyHost=your-proxy-host.com
https.proxyPort=8080
https.proxyUser=
https.proxyPassword=
https.nonProxyHosts=localhost|192.168.0.1

http.proxyHost=your-proxy-host.com
http.proxyPort=8080
http.proxyUser=
http.proxyPassword=
1.4.3. Access the system proxy URL
The system proxy can be accessed by Proxy Utilities
1.4.4. Implicit setup (not recommended)
Since Java 11, it is possible to pass the system’s preconfigured proxy into the JVM.
gradle test -Djava.net.useSystemProxies=trueThis affects all Java internal network connections which uses ProxySelector, but it will not set the environment variables and are transparent to Proxy Utilities and any Browser capabilities.
1.5. Logging
The log configuration prints out to System.out by default.
If you want to have more control over several log levels of classes, add a log4j2.xml to your resources/.
<?xml version="1.0" encoding="UTF-8" ?>
<Configuration packages="eu.tsystems.mms.tic.testframework.logging">
    <Appenders>
        <Console name="CONSOLE">
            <!--
                The marker %contextIds gets replaced by internal plugins registered from
                plugins packages in the <configuration> node
            -->
            <PatternLayout pattern="%d{dd.MM.yyyy HH:mm:ss.SSS} [%t][%p]%contextIds: %c{2} - %m%n" />
        </Console>
    </Appenders>
    <Loggers>
        <Root level="info">
            <AppenderRef ref="CONSOLE"/>
        </Root>
    </Loggers>
</Configuration>
You can also change the root log level from the command line via.
-Dlog4j.level=DEBUGTesterra Framework
2. WebDriverManager
2.1. Overview
WebDriverManager is the central component to create and close your WebDriver sessions.
WebDriverManager uses the standard Selenium Webdriver but it is easier to configure your. To create a new browser session you only need a single call.
2.2. WebDriver sessions
Before you can use WebDriver sessions, you have to setup a Selenium-compatible server.
2.2.1. Setup remote sessions
For using a remote Selenium server (e.g. a Selenium Grid) you only have to tell Testerra where it can be find.
tt.webdriver.mode=remote
tt.selenium.server.host=localhost
tt.selenium.server.port=4444
tt.selenium.server.url=http://localhost:4444/wd/hub| The browser support depends on the remote selenium setup. |
2.2.2. Create a local session (not recommended)
Regularly, there is no reason to use local Selenium sessions based on binaries. We won’t recommend using that, because we’ve experienced slightly differences between the local and remote behaviour.
However, Testerra supports using local web drivers.
-
Search for your browser’s selenium driver online, like selenium gecko driver for Firefox or selenium crome driver for Chrome based browsers
-
Download your WebDriver binary from browser vendor’s website to a local location
-
Make sure the driver version supports your installed browser
-
Since the properties are system properties, you need to put the location of the binaries to the
system.propertiesfile as mentioned in the Property files section.
tt.webdriver.mode=local
webdriver.gecko.driver="C:\\absolute\\path\to\\your\\geckodriver.exe"

# or for other browsers
webdriver.chrome.driver=...
webdriver.edge.driver=...
webdriver.ie.driver=...
You can also pass the wedriver by the command line using
-Dwebdriver.gecko.driver=C:\absolute\path\to\your\geckodriver.exe2.2.3. Define browser type and version
Before starting a WebDriver session, you should configure your desired browser like.
# Only browser type
tt.browser.setting=firefox

# ... or with version
tt.browser.setting=firefox:65|
You can also define browser config via the settings If you have different browser configurations in your Selenium grid you have to take care about the correct combination! |
2.2.4. Usage of WebDriver sessions
On the first call of
WebDriver driver = WebDriverManager.getWebDriver();Selenium is triggered to open a new Browser windows with the defined URL.
Use remote Selenium server as often as possible, also for development.
So your project is independent of any WebDriver configuration and needed Webdriver binary files.
|
For every other call of getWebDriver() in the same test context WebDriverManager always returns the existing session.
This makes it possible to retrieve the current session in any context and avoids to force the user to pass the instance around.
2.2.5. WebDriver lifecycle
The default behaviour of Testerra’s WebDriverManager is, to create unique WebDrivers for each thread and/or test method.
That prevents issues in mutual interference between multiple threads.
-
Every WebDriver created in a thread, will be closed in this thread after the test method. See Use multiple sessions
-
You can keep a WebDriver in a thread over multiple methods. See Shared sessions in one thread
-
You can reuse WebDrivers by sharing sessions over different threads
2.2.6. Use multiple sessions
The WebDriverManager can handle more than one session in one test context.
Every session has a defined session key.
If no key was set, the default session key is called default.
The following example creates two independent browser sessions:
WebDriver driver = WebDriverManager.getWebDriver();
WebDriver driverWindow2 = WebDriverManager.getWebDriver("window2");

// Get the session key
String key1 = WebDriverManagerUtils.getSessionKeyFrom(driver);        // key1 contains 'default'

String key2 = WebDriverManagerUtils.getSessionKeyFrom(driverWindow2); // key2 contains 'window2'
2.2.7. Close a session
In most cases it is not needed to close your session manually. Testerra always closes all open session at the end of a test method.
To close active sessions manually, do the following:
// Close all active session in the current test context.
WebDriverManager.shutdown();

// Close all active session without check the wdm.closewindows.aftertestmethods property
WebDriverManager.forceShutdown()

// Close all active session in all current parallel test threads.
WebDriverManager.forceShutdownAllThreads()|
Testerra calls At the end of the test run Testerra always calls Please do not use Selenium provided methods to close |
2.2.8. Shared sessions in one thread
You can reuse the WebDriver session over multiple methods in the same thread by setting the following property:
tt.wdm.closewindows.aftertestmethods=false@Test
public void test1() {
WebDriver driver = WebDriverManager.getWebDriver();
}
@Test
public void test2() {
// You get the already opened session from test1
WebDriver driver = WebDriverManager.getWebDriver();
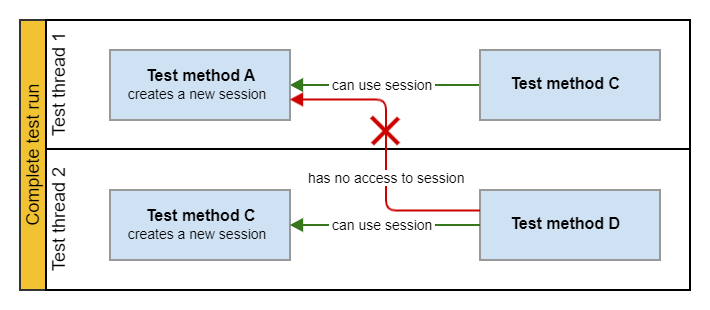
}| You can only reuse the session in the current thread. If you run parallel tests, you have no access to the session between parallel test threads. |
Special behaviour for config methods (deprecated)
When you create a WebDriver in a setup method by is annotated with @Before… or @After…, the session will not be closed after that method, even when tt.wdm.closewindows.aftertestmethods is true.
@BeforeMethod
public void setupWebDriver() {
    // This WebDriver will not be closed, because its a setup method
    WebDriver driver = WebDriverManager.getWebDriver();
}

@Test
public void test1() {
    // You get the already opened session
    WebDriver driver = WebDriverManager.getWebDriver();
}
2.2.9. Shared sessions over different threads
To use a browser session over different test threads, you need an exclusive session.
Exclusive sessions are identified by a special uuid, not by the standard session key.
private static String uuid = null;

@Test
public void test1() {
    WebDriver driver = WebDriverManager.getWebDriver();
    uuid = WebDriverManager.makeSessionExclusive(driver);
}

@Test
public void test2() {
    // Get the exclusive session
    WebDriver driver = WebDriverManager.getWebDriver(uuid);
}
|
An exclusive session has an unlimited lifetime. You need do close this session manually. |
2.3. WebDriver configuration
2.3.1. Global configuration
A global configuration applies to all new sessions created by WebDriverManager.
You can set a global configuration by
-
test.properties -
at runtime by
System.setProperty() -
at runtime by
WebDriverManager.getConfig()(only browser session behaviour)
Configure with test.properties
Like shown above all session properties can be set in test.properties.
| Property | default | Description |
|---|---|---|
tt.browser.setting |
na. |
Define browser type and optional browser version as single string like
|
tt.browser |
na. |
Only defines the browser type, will be overwritten by tt.browser.setting. |
tt.browser.version |
na. |
Only defines the browser version, will be overwritten by tt.browser.setting. |
tt.baseurl |
na. |
URL of the first site called in a new browser session. |
tt.webdriver.mode |
remote |
Sets the webdriver mode. remote uses an external Selenium server |
tt.selenium.server.url |
na. |
The complete URL to a remote Selenium server. This setting overrides the following two properties. |
tt.selenium.server.host |
localhost |
The host name of the remote Selenium server. |
tt.selenium.server.port |
4444 |
The port of the remote Selenium server. |
tt.browser.maximize |
false |
Try to maximize the browser window. |
tt.browser.maximize.position |
self |
Screen position for the window to maximize. If you have several screens and want to maximize the window on another screen than your default screen, you can choose between (left, right, top or bottom) |
tt.window.size |
1920x1080 |
Default window size for all new sessions (when tt.browser.maximize is |
tt.display.resolution |
1920x1080 |
Deprecated by tt.window.size |
tt.wdm.closewindows.aftertestmethods |
true |
If true, after every test method all open browser windows are closed. |
tt.wdm.closewindows.onfailure |
true |
If true, after failed test methods all open browser windows are closed |
tt.wdm.timeouts.seconds.window.switch.duration |
5 |
Maximum duration to wait for on a |
webdriver.timeouts.seconds.pageload |
120 |
Defines the Selenium timeout for page load seconds. |
webdriver.timeouts.seconds.script |
120 |
Defines the Selenium timeout for execution of async scripts in seconds. |
Configure with System.setProperty()
At runtime you can change the global configuration of all properties with System.setProperty().
System.setProperty(TesterraProperties.BROWSER, Browsers.firefox);
System.setProperty(TesterraProperties.BROWSER_VERSION, "66");|
This is not recommended. Decide before test start about your global browser settings or use |
Configure with WebDriverManager.getConfig()
Some of the WebdriverManager settings you can change as follows
// tt.wdm.closewindows.aftertestmethods
WebDriverManager.getConfig().setShutdownSessionAfterTestMethod(true);

// tt.wdm.closewindows.onfailure
WebDriverManager.getConfig().setShutdownSessionOnFailure(false);

// tt.browser.maximize
WebDriverManager.getConfig().setMaximizeViewport(true);|
Keep in mind, that after the complete test run a session shutdown is being forced. |
You can reset the settings to the default values or defined in test.properties as follows
WebDriverManager.getConfig().reset();2.3.2. Local configuration
If you only want to change the settings for one session, you can use AbstractWebDriverRequest.
All defined attributes overrides the standard configuration.
| If an attribute is not set the global definition is used. |
DesktopWebDriverRequest myRequest = new DesktopWebDriverRequest();
myRequest.setBaseUrl("http://example.org");
myRequest.setBrowser(Browsers.firefox);
myRequest.setBrowserVersion("66");
myRequest.setSessionKey("mysession");     // if no custom session defined, the default value 'default' is set

WebDriver driver = WebDriverManager.getWebDriver(myRequest);
2.4. Working with sessions
2.4.1. Get current session
WebDriver driver = WebDriverManager.getWebDriver();
Optional<SessionContext> sessionContext = WebDriverSessionsManager.getSessionContext(driver);
2.4.2. Switching windows
Sometimes you will come across testing websites with multiple windows, such as popups or something similar.
To switch windows in a easy way Testerra provides some methods, which will automatically retry the window switching for maximum of seconds you can define with tt.wdm.timeouts.seconds.window.switch.duration.
// Switch to a window by matching title
Optional<WebDriver> optionalWebDriver
    = WebDriverUtils.switchToWindow(webDriver -> webDriver.getTitle().equals(windowTitle));

// Window context switched
optionalWebDriver.isPresent();
2.4.3. Difference in session key and session id
There is a difference between session key and session id. The session key is value that you can declare and provide to handle multiple web driver sessions in one test method, as you can read in section "Multiple sessions". The session id is an internal id of Selenium itself.
WebDriver driver = WebDriverManager.getWebDriver("mySession");

// Returns generated UUID of the Selenium session
String sessionId = WebDriverUtils.getSessionId(driver);

// will be "mySession"
String sessionKey = WebDriverManagerUtils.getSessionKey(driver);
3. Browser capabilities
3.1. Setting global capabilities
You can customize your browser session by setting so called capabilities for every browser type before the WebDriver has been initialized.
import eu.tsystems.mms.tic.testframework.useragents.FirefoxConfig;

class MyTest extends TesterraTest {
    @BeforeSuite
    void setupBrowsers() {
        WebDriverManager.setUserAgentConfig(Browsers.firefox, (FirefoxConfig) options -> {
            options.addPreference("intl.accept_languages", "de-DE");
        });
    }
}|
Do NOT set browser capabilities with WebDriverManager like: |
3.2. Setting local capabilities
A local defined capability means its only available in a specific browser session.
DesktopWebDriverRequest request = new DesktopWebDriverRequest();
DesiredCapabilities caps = request.getDesiredCapabilities();
caps.setCapability(CapabilityType.PLATFORM_NAME, "linux");

// Start your session with the DesktopWebDriverRequest object
WebDriver driver = WebDriverManager.getWebDriver(request);|
Have a look into Browser specific knowledge for specific browser options. |
3.3. Proxy setup
If you want that the browser uses a proxy for the SUT, you can just configure that by default Selenium capabilites.
| Make sure that your WebDriver supports the Proxy-Capability. For example the MicrosoftWebDriver for Legacy Edge does not support proxy setup (see Edge WebDriver Capabilities). |
| If you want to setup a proxy for the runtime environment but the browser, you have to follow the instructions at Using a proxy |
3.3.1. Default configuration
The following code setups a proxy based on the System’s proxy configuration and a custom proxy.
import org.testng.annotations.BeforeSuite;
import org.openqa.selenium.remote.DesiredCapabilities;
import eu.tsystems.mms.tic.testframework.webdrivermanager.WebDriverManagerUtils;
import eu.tsystems.mms.tic.testframework.webdrivermanager.WebDriverProxyUtils;
import org.openqa.selenium.Proxy;

public abstract class AbstractTest extends TesterraTest {

    @BeforeSuite
    public void proxySetup() {
        WebDriverProxyUtils utils = new WebDriverProxyUtils();
        final Proxy defaultProxy = utils.getDefaultHttpProxy();
        final Proxy otherProxy = utils.createHttpProxyFromUrl(
                new URL("http://proxyUser:secretPassword@my-proxy:3128"));

        /**
         * Global browser proxy configuration
         */
        DesiredCapabilities dc = new DesiredCapabilities();
        dc.setCapability(CapabilityType.PROXY, defaultProxy);
        WebDriverManager.setGlobalExtraCapabilities(dc);

         /**
         * Browser specific proxy configuration
         */
        WebDriverManager.setUserAgentConfig(Browsers.chrome, new ChromeConfig() {
            @Override
            public void configure(ChromeOptions options) {
                options.setProxy(otherProxy);
            }
        });
    }
}
WebDriverProxyUtils.getDefaultHttpProxy() only returns the proxy configuration for HTTP, HTTPS and non-proxy connections.
|
4. GuiElements
4.1. Overview
GuiElements are representations of elements of the tested website, like buttons, search fields, checkboxes or even just DOM elements.
GuiElements are not, but based on the Selenium WebElement and add more functionality to them. Since a GuiElement is just a pointer to a locator, it’s using the same definition as WebElements By (Selenium docs).
GuiElements are self refreshing: Every action on it will trigger a find call, so the current state is always up to date when the requested action takes place. There is de facto no StaleElementReferenceException on GuiElements like it could be when using vanilla WebElements.
4.2. Creation
4.2.1. Create default GuiElement
For every GuiElement you need the current WebDriver object and a locator (Selenium docs).
GuiElement myElement = new GuiElement(driver, By.id("elementId"));
GuiElement button1 = new GuiElement(driver, By.name("button"));
GuiElement textOutputField = new GuiElement(driver, By.xpath("//p[@id='99']"));| A GuiElement always points to the first element found by the given locator. Even when your locator would return multiple elements, it just represents one. You can make your locators to force uniqueness or use element lists. |
4.2.2. Create SubElements
The Method getSubElement() generates a new GuiElement. It will only be searched in the DOM tree below the element on which the method was called.
GuiElement upper = new GuiElement(driver, By.name("upperElement"));

// Create the sub elements
GuiElement lower = upper.getSubElement(By.name("lowerElement"));
GuiElement lower = upper.getSubElement(By.xpath(".//p[@id='element']")); (1)
GuiElement lower = upper.getSubElement(By.xpath("//p[@id='element']")); (2)
GuiElement lower = upper.getSubElement(By.xpath("./p[@id='element']")); (3)| 1 | Find any matching descendant |
| 2 | Corrects the selector prefix to './/' |
| 3 | Find any matching child |
4.2.3. Element lists
A locator can always return multiple elements. Even if a GuiElement is just a pointer to the first element of the result, it could contain more than one.
You can get the amount of found elements by calling.
GuiElement span = new GuiElement(driver, By.xpath("//a/span"));
int count = span.getNumberOfFoundElements();
And access the elements by using the getList() method.
List<GuiElement> allSpans = span.getList();From this moment, every GuiElement of the list is now a pointer to the exact index position of the element results and behaves as the selector would by like (//a/span)[n].
4.2.4. Advanced GuiElement locating
The Locate extension provides more features than standard Selenium By.
Locate unique elements
If you want to make sure, that your element is unique.
import eu.tsystems.mms.tic.testframework.pageobjects.location.Locate;

GuiElement myElement = new GuiElement(driver, Locate.by(By.id("elementId")).unique());
This will throw an exception, if not one WebElement has been found.
Locate displayed items only
GuiElement myElement = new GuiElement(driver, Locate.by(By.xpath(".//button")).displayed());Prepared xpath expressions
Using prepared expressions makes your selectors more readable.
Locate byText = Locate.prepare("//button[text()='%s'])");
Locate byClass = Locate.prepare("//%s[contains(@class, '%s')][%d]");

GuiElement loginButton = new GuiElement(driver, byText.with("Login"));
GuiElement logoutButton = new GuiElement(driver, byClass.with("button", "btn-logout", 1));
Filtering elements
You can also filter elements during find.
Locate byText = Locate.by(By.xpath("//button")).filter(webElement -> webElement.getText().equals("Open again"));

GuiElement buttonContainsText = new GuiElement(driver, byText);
Default locator configurator
When you want to preconfigure all locators in the current thread, you can use
Locate.setThreadLocalConfigurator(locator -> {
   // Configure your locator here
});
GuiElements inside frames
Accessing WebElements inside frames requires changing the active frame before any action. GuiElements do that automatically.
For creating new GuiElements within one or more frames, the frames have to be passed to the constructor. A frame can be the HTML element <frame> inside a <frameset> or <iframe>.
GuiElement frame1 = new GuiElement(driver, By.id("frame1"));

// frame2 is child of frame1
GuiElement frame2 = new GuiElement(driver, By.id("frame2"), frame1);

// target is child of frame2 which is child of frame1,
// in this case the frames are searched recurse automatically
GuiElement target = new GuiElement(driver, By.id("target"), frame2);
When accessing the WebElement instance, you are responsible for frame switches by yourself.
You can perform these as following.
WebElement webElement = target.getWebElement();
if (target.hasFrameLogic()) {
    target.getFrameLogic().switchToCorrectFrame();
}

// Perform your actions on webElement here
webElement.findElements("//div");

if (target.hasFrameLogic()) {
    target.getFrameLogic().switchToDefaultFrame();
}4.3. Actions
GuiElement provides a variety of action methods. Beside the known WebElement methods there are some more useful methods to interact with the web site.
4.3.1. Click on elements
GuiElement element = new GuiElement(driver, By.id("button"));

element.click();
element.doubleClick();
element.rightClick();| If you have troubles using these methods, take a look to the fallback solution Desktop WebDriver utilities. |
4.3.2. Enter text
GuiElement element = new GuiElement(driver, By.id("input"));

// Enters the given text in a input or textfield.
// Any old values are automatically deleted before input.
// The type method has a value check. If the given string is NULL or empty, the method does nothing.
element.type("my text");

// The standard Selenium method is used.
// You can also use the Selenim Keys class to enter special keys.
element.sendKeys("my text");
element.sendKeys("my text" + Keys.ENTER);

// Delete the content of an input field.
element.clear();
4.3.3. Use select boxes
GuiElement element = new GuiElement(driver, By.id("select"));

// Get the Select WebElement of a GuiElement
Select select = element.getSelectElement();

// You can use all Selenium Select methods to interact.
select.selectByIndex(2);
select.selectByVisibleText("option");
List<WebElements> list = select.getAllSelectedOptions();
4.3.4. Use check boxes
GuiElement element = new GuiElement(driver, By.id("checkbox"));

// Only check boxes returns true, all other elements return false
boolean check = element.isSelectable();

// Check and uncheck the check box
element.select();
element.deselect();

// true = check, false = uncheck
element.select(true);
4.3.5. Scrolling
You can scroll the browser viewport until the element is in the middle viewport if possible.
GuiElement element = new GuiElement(driver, By.id("image"));

element.scrollIntoView();

// Lets offset pixel distance from the top of the viewport
element.scrollIntoView(new Point(0, -20))
4.3.6. Mouse over
You can simulate the mouse pointer is moved over an element.
GuiElement element = new GuiElement(driver, By.id("label"));

element.mouseOver();| If you have troubles using this method, take a look to the fallback solution Desktop WebDriver utilities. |
4.3.7. Drag and drop actions
With the utils class MouseActions you can execute a drag-and-drop actions.
Source and target GuiElements can be located in different frames.
GuiElement source = new GuiElement(driver, By.id("elem1"));
GuiElement target = new GuiElement(driver, By.id("elem2"));

MouseActions.dragAndDropJS(source, target);

// You can add one or more DragAndDropActions
MouseActions.dragAndDropJS(source, target, DragAndDropOption.CLICK_AFTER_RELEASE);

// This method provides a swipe of an element to a relative position from the element.
int offsetX = 50;   // Pixel
int offsetY = 125;  // Pixel
MouseActions.swipeElement(source, offsetX, offsetY);4.4. Assertions
GuiElements provide many kinds of assertion methods to verify your elements.
4.4.1. Functional asserts
If a functional assert fails, it will make the whole test fail and abort.
GuiElement element = new GuiElement(driver, By.id("button"));

// assertText only returns true, if the text is exactly the passed string
element.asserts().assertText("mytext");
element.asserts().assertTextContains("my");
element.asserts().assertTextContainsNot("foo");

// assertIsPresent is true, if the element can be found within the currect site
element.asserts().assertIsPresent();
element.asserts().assertIsNotPresent();

// assertIsDisplayed returns true, if the element is visible and reachable by Selenium
element.asserts().assertIsDisplayed();
element.asserts().assertIsNotDisplayed();

// CSS class checks
element.asserts().assertCssClassIsPresent("active");
element.asserts().assertCssClassIsGone("disabled");

// Visibility checks
element.asserts().assertVisible(boolean fullyVisible);
element.asserts().assertNotVisible();
4.4.2. Assert collector of functional asserts
Assert Collector is a collector for functional asserts of a GuiElement. Failing an assert it will not abort the test method, but it will throw an exception at the end of the test method. So you have a chance to validate many more aspects in one test run.
GuiElement element = new GuiElement(driver, By.id("label"));

element.assertCollector().assertIsPresent();
element.assertCollector().assertText("mytext");
4.4.3. Optional asserts
Optional asserts do not let the test fail. But the assertion message will be added to the log with loglevel ERROR.
Optional asserts provide the same assertion methods like functional asserts.
GuiElement element = new GuiElement(driver, By.id("label"));

element.optionalAsserts().assertIsPresent();
element.optionalAsserts().assertText("mytext");
4.4.4. Layout asserts
GuiElements can be checked for their relative layouts.
GuiElement left = new GuiElement(driver, By.id("left"));
GuiElement right = new GuiElement(driver, By.id("right"));

left.asserts().assertLayout(Layout.outer().leftOf(right));
The following checks are available in the Layout class:
-
leftOf
-
rightOf
-
above
-
below
-
sameTop
-
sameBottom
-
sameLeft
-
sameRight
The same methods have a delta parameter that can be used to set deviations.
Inner and outer borders
For WebElements, there are internal and external sizes that can be addressed by the layout check. Interesting are the CSS values for 'border' and 'padding'. The 'margin' is not relevant.
A check with Layout.outer() also observed the padding and margin definitions.
A check with Layout.inner() ignores padding and margin. It takes the position of the inner elements for check.
left.assertLayout(Layout.inner().leftOf(right));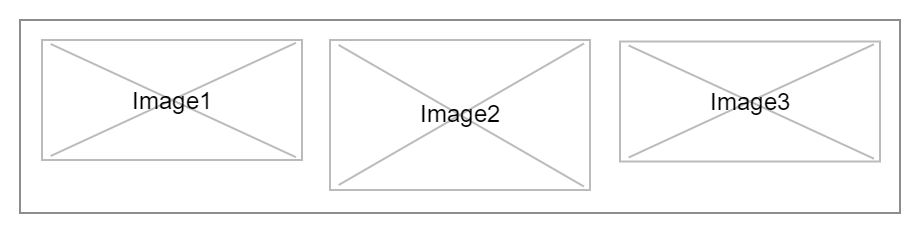
GuiElement image1 = new GuiElement(driver, By.xpath("//..."));
GuiElement image2 = new GuiElement(driver, By.xpath("//..."));
GuiElement image3 = new GuiElement(driver, By.xpath("//..."));

// Assertions are true
image1.assertLayout(Layout.outer().leftOf(image2));
image1.assertLayout(Layout.outer().sameTop(image2, 0));
image1.assertLayout(Layout.outer().sameBottom(image3, 0));

// Assertions are false
image1.assertLayout(Layout.outer().sameBottom(image2, 0));
4.5. Checks
Similar to the assertion methods GuiElement provides so called check methods.
4.5.1. Visibility checks
Checks if the element is present in the DOM
element.isPresent();Checks if the element is present in the Viewport,
if it is visible by it’s display and visibility style properties
and if it’s width and height are both greater than 0.
element.isDisplayed();Checks if the element is displayed and if it’s partially or fully visible in the scroll area of the viewport.
element.isVisible(boolean fullyVisible);
It doesn’t relate to opacity or z-index style properties. If you need to test the perceptual visibility to the human eye, you should consider implementing Layout Check.
|
|
It is not recommended to use these methods for assertions because they return the current state of the element without observing changes of the element or the page. The assertion |
4.6. Get properties
4.6.1. Selenium webelement properties
GuiElement provide all Selenium methods get more details about the webelement.
...
<a href="newpage.html" style="font-size: 20px;">My link</a>
...GuiElement element = new GuiElement(driver, By.xpath("//a"));
String text = element.getText(); // returns "My link"
String attr = element.getAttribute("href"); // returns "newpage.html"
String name = element.getTagName(); // returns "a"
Point point = element.getLocation(); // returns the top left corner of the element
Dimension dim = element.getSize(); // returns width and heigth of the element
Rectangle rect = element.getRect(); // returns rectangle with location and size
String value = element.getCssValue("font-size"); // returns "20px"4.6.2. Additional properties
GuiElement provide some more special methods which could helpful for assertions.
...
<a href="newpage.html" style="font-size: 20px;">
    <span>My</span>
    <span>Link</span>
</a>
...GuiElement link = new GuiElement(driver, By.xpath("//a"));
List<String> list = link.getTextsFromChildren(); // returns a list ["My", "Link"]4.7. Waiters
In testing practice the test automation code must tolerate delays caused e.g. by page loading or javascript activities when checking conditions on GuiElements.
Therefore GuiElement provides dedicated methods to wait for a condition that operate on the following principle:
If the condition (which is checked continuously) is met within the timeout then the wait methods return true.
Otherwise, after the timeout has passed they return false without any further action or assertion.
See also Timeout-Settings
boolean result;

result = element.waits().waitForIsDisplayed();
result = element.waits().waitForText(String text);
result = element.waits().waitForAttribute(String attribute, String value);
result = element.waits().waitForAttributeContains(String attribute, String value);
result = element.waits().waitForAttributeContainsNot(String attribute, String value);
result = element.waits().waitForIsSelected();
result = element.waits().waitForTextContains("Hello");
result = element.waits().waitForTextContainsNot("Foo bar");
result = element.waits().waitForCssClassIsPresent("active");
result = element.waits().waitForCssClassIsGone("disabled");
result = element.waits().waitForIsVisible(boolean fullyVisible);
result = element.waits().waitForIsNotVisible();
4.8. Internals
The find mechanism for a GuiElement in Testerra works different as in plain Selenium.
When using a constructor for a GuiElement instantiation, Testerra internally will add some facades / decorators to make things easier.
The most important decorator that is added by default is the GuiElementCoreSequenceDecorator -which adds a sequence to all method calls against a GuiElement.
Example: When calling the isPresent() method on a GuiElement the added GuiElementSequenceDecorator will fire up an internal find() call to the GuiElement and therefore a find() call to the underlying Selenium WebElement.
But instead of calling the find() method once, it will execute this call in a default sequence every 500ms.
Therefor the property tt.element.timeout.seconds defined in test.properties will be used as a hard timeout for this sequence.
If the find() does not run successfully after the defined timeout it will fail.
5. PageObjects
5.1. Overview
5.1.1. What is a page object?
A page objects represents a HTML pages and or a subpage. It contains GuiElements with describe the actual page and methods to provide actions on them.
In your test you only uses the provided actions of your page like an API. The page object himself uses the GuiElements as an API to interact with the website.
5.1.2. Navigation Principle
In a regular Web Application there is a defined navigation flow. This means there are pages with actions on it that let you navigate to other pages.
In the example below we have a search dialog with a search action on it that lets you navigate to a ResultPage with the search result.
When a search is performed the browser will navigate to the ResultPage. In your page you create a new object of your next page.
This new page object is used for the next steps in your test.

5.1.3. Example
The following page contains two GuiElements and one method for a user action 'search a string'.
Within the method search the defined GuiElements are used to execute a search.
The annoation Check marks the GuiElements as mandatory for the page. Testerra automatically verifies these elements when this page is instantiated (Check Annotations).
public class SearchPage extends Page {

    @Check
    private final GuiElement searchButton =
            new GuiElement(this.getWebDriver(), By.name("searchButton"));

    @Check
    private final GuiElement inputField =
            new GuiElement(this.getWebDriver(), By.name("inputField"));

    // constructor
    public SearchPage(WebDriver driver) {
        super(driver);
    }

    // search action on page
    public ResultPage search(String text){
        inputField.type(text);
        searchButton.click();
        return PageFactory.create(ResultPage.class, this.getWebDriver());
    }
}
The following lines demonstrate how to use page objects in your test method.
import ...

public class TestClass extends TesterraTest {

    @Test
    public void myTest() {
        WebDriver driver = WebDriverManager.getWebDriver();
        HomePage homePage = PageFactory.create(HomePage.class, driver);
        SearchPage searchPage = homePage.openSearch();
        ResultPage resultPage = searchPage.search("search text");
        resultPage.assertResultSetIsNotEmpty();
        homePage = resultPage.close();
    }
}
5.2. Instantiation
5.2.1. PageFactory
Instead of creating Pages with the page constructor pages should created by using the PageFactory as demonstrated in the example.
When the page is instantiated, Testerra automatically checks its annotated elements.
HomePage homePage = PageFactory.create(HomePage.class, driver);With the PageFactory you can also perform to check a page was gone. With this you can make sure, that your page is NOT shown any more. For example, you want to verify a dialog windows was closed after a click.
PageFactory.checkNot(searchPage.class, driver);The checkNot is successful if at least one mandatory GuiElement ("@Check") is not shown.
5.2.2. Page Prefixes
Page Prefixes can influence which concrete classes get instantiated by the PageFactory. They work together with a inheritance scheme of page classes. This can be useful if there is a base page which can come in different concrete variations. Example:
There is a BaseClass which inherits from the Page class and contains the basic functionality of a page.
Then the Page can come in 2 different variations.
We can represent this as Variation1BaseClass and Variation2BaseClass.
They both inherit from BaseClass.
Before instantiation, we can set the prefix using the PageFactory.
Then we instantiate it and we can get our variation of the base class.
PageFactory.setGlobalPagesPrefix("Variation1");
//this actualy creates a Variation1BaseClass
BaseClass baseClass = PageFactory.create(BaseClass.class, driver);
Default is no prefix.
Usage:
// Set a global Prefix
PageFactory.setGlobalPagesPrefix("prefix");

// Set a thread local prefix. See next row about cleaning this prefix.
PageFactory.setThreadLocalPagesPrefix("prefix");

// The thread local pages prefix is not cleared automatically,
// be sure to always set the correct one or clear  itafter using.
PageFactory.clearThreadLocalPagesPrefix();
5.3. Responsive Page Objects
Sometimes responsive web pages are designed in a way that they change their structure depending on the browsers viewport. To represent this behavior for tests, responsive page objects can be used. With this feature, different page objects can be created to represent the page using different window sizes. This allows the tests to respond to varying page structures.
The PageFactory will instantiate the correct page class automatically based on the current viewport.
5.3.1. Page structure
To use this feature, the page classes must follow a special naming and inheritance scheme.
First a base class is needed. It represents the responsive page in general. This base class inherits from the Page class. Then classes for special viewports are created, which inherit from the base class. They represent the page in a defined viewport range.
The name scheme for size depended classes is
<BaseClass>_<minimun-resolution>_<maximum-resolution>.
Possible values for resolutions are numbers in pixels with added "px" and "Min" or "Max".
This example should help making things clear. The base class should contain the common functions of that page,
/** base page class */
abstract class ResponsiveTestPage extends Page { ... }
while inherited classes contain elements and functions special to that specific screen resolution.
/**	page instantiated for width 600px or less. */
class ResponsiveTestPage_Min_600px extends ResponsiveTestPage { ... }

/** page is instantiated for width from 601 to 1199 px */
class ResponsiveTestPage_601px_1199px extends ResponsiveTestPage { ... }

/** page instantiated for width  1200 px or more. */
class ResponsiveTestPage_1200px_Max extends ResponsiveTestPage { ... }
Responsive Page Objects work also together with Page Prefixes.
5.3.2. Usage
In the test method only the base class will be instantiated. The PageFactory will detect the naming scheme and then use the correct classes automatically. Instantiating a responsive page in the example above would look like this:
ResponsiveTestPage testPage = Pagefactory.create(ResponsiveTestPage.class, this.getWebDriver());The parameters for the factory are the base class and the current webdriver instance.
When a page is first instantiated, the factory searches for all subclasses of this page. The filtering is then performed using the naming scheme. The current viewport width of the WebDriver object is then determined. On the basis of the determined value, the system searches for the class that offers the next smallest resolution in relation to the current browser width.
The package where the factory searches the resolution specific page classes can be configured by a property setting.
| Property | default | Description |
|---|---|---|
tt.project.package |
eu.tsystems.mms.tic |
The package where the PageFactory searches for screen resolution specific subclasses. |
tt.page.factory.loops |
20 |
The loop detections prevents endless recursive creation of new page instances. This property defines the max count of loops. |
5.4. Check Annotations
The @Check annotation is used to verify the actual presence of an element on the site.
All GuiElements that are marked with the @Check annotation are automatically checked when instantiated by the PageFactory.
In the example, the first GuiElement has the @Check annotation, the second doesn’t.
The result is, that the presence of the first element will be checked by the constructor, the second won’t.
If a checked element is not found, the constructor will throw a PageNotFoundException.
@Check
private GuiElement checked = new GuiElement(driver, By.name("checked"));
//no @Check here
private GuiElement unchecked = new GuiElement(driver, By.name("unchecked"));
The @Check annotation will use the default CheckRule defined in test.properties.
It is also possible to overwrite the default CheckRule for a single @Check annotation.
@Check(checkRule = CheckRule.IS_PRESENT)
private GuiElement checked = new GuiElement(driver, By.name("checked"));
Change the check rules for the whole project (global) with the following:
tt.guielement.checkrule=IS_PRESENTAvailable CheckRules are
-
IS_DISPLAYED
-
IS_NOT_DISPLAYED
-
IS_PRESENT
-
IS_NOT_PRESENT
The default is IS_DISPLAYED.
With the optional attribute, the @Check only adds an optional assertion to the report.
The test will not be interrupted at this position.
@Check(optional = true)
private GuiElement checked = new GuiElement(driver, By.name("checked"));
With following @Check annotation you can define a special error message.
@Check(prioritizedErrorMessage = "My error message.")
private GuiElement checked = new GuiElement(driver, By.name("checked"));
5.5. Page loaded callback
You can add a custom action if a page was loaded successfully.
public class MyPage extends Page {

    ...

    @Override
    protected void pageLoaded() {
        super.pageLoaded();
        // Add here your custom action
    }
}
5.6. Error handling
Exceptions caused by @Check annotations can be catched by overwriting the checkPageErrorState() method in the concrete page class.
This is an example how to overwrite the checkpage error inside a created page class.
@Override
protected void checkPageErrorState(Throwable throwable) throws Throwable {
    // insert your code
}
This method body for example could throw other exceptions or write something in the log.
5.7. Timeout Setting
The checks are performed with a timeout. The default timeout is set by the property tt.element.timeout.seconds in test.properties
With the following annotation the GuiElement timeout can be changed for all GuiElements in one page:
@PageOptions(elementTimeoutInSeconds = 60)
public class ExamplePage extends Page {
	// insert your code
}
5.8. Assertions
Pages objects offer some assertions which mostly work like their equivalents on GuiElements.
In difference to GuiElements here the whole page is searched for the given element in recursive order.
ResultPage resultPage = PageFactory.create(ResultPage.class, driver);

String text = "Expected Text";

// Asserts if text is present or not.
boolean isTextPresent = resultPage.assertIsTextPresent(text);
boolean isNotTextPresent = resultPage.assertIsNotTextPresent(text);

// Asserts if text is displayed or not.
boolean isTextDisplayed = resultPage.assertIsTextDispayed(text);
boolean isTextNotDisplayed = resultPage.assertIsNotTextDisplayed(text);

// Work like the methods above. In addition, the description String
// is added to the exception if the assert fails.
String errorTextNotPresent = text + " is not present on this page.";
String errorTextNotDisplayed = text + " is not displayed on this page.";
resultPage.assertIsTextPresent(text, errorTextNotPresent);
resultPage.assertIsTextDisplayed(text, errorTextNotDisplayed);
5.9. Additional Page Methods
ResultPage resultPage = PageFactory.create(ResultPage.class, driver);

// Checks on the whole page if the text is displayed.
boolean isTextDisplayed = resultPage.isTextDisplayed(String text);

// Checks on whole page if the text is present.
boolean isTextPresent = resultPage.isTextPresent(String text);

WebDriver myDriver = resultPage.getDriver();
Excecution and controlling
6. Test execution
Testerra has several features to handle and adjust a test execution, which are described in the following paragraphs.
6.1. Conditional behaviour
For managing the execution behaviour of tests in suites there are means to skip tests and avoid closing browser windows after failures.
# all browser windows remain open after first failure, default = false
tt.on.state.testfailed.skip.shutdown=true

# skip all tests after first failure, default = false
tt.on.state.testfailed.skip.following.tests=true
6.2. Failure Corridor
This mechanism is used to define the test goal of test runs so that it only fails with an invalid failure corridor.
This feature is enabled by default with the following property.
tt.failure.corridor.active=trueWith an enabled failure corridor, you need to define the maximum amount of failures per weight:
tt.failure.corridor.allowed.failed.tests.high=0
tt.failure.corridor.allowed.failed.tests.mid=1
tt.failure.corridor.allowed.failed.tests.low=2|
If you do not define any failure corridor, the default value |
To change the weight for each test, just annotate it with @FailureCorridor, where High is default.
// This testcase is marked with a high weight.
@FailureCorridor.High
@Test
public void test1() throws Exception {
    Assert.fail();
}

// This testcase is not marked, but the default weight is high.
@Test
public void test2() throws Exception {
    Assert.fail();
}

// This testcase is marked with a middle weight.
@FailureCorridor.Mid
@Test
public void test3() throws Exception {
    Assert.fail();
}

// This testcase is additional marked with @Fails.
// So the test result is ignored by the Failure corridor.
@Fails
@FailureCorridor.Mid
@Test
public void test4() throws Exception {
    Assert.fail();
}

// This testcase is marked with a low weight.
@FailureCorridor.Low
@Test
public void test5() throws Exception {
    Assert.fail();
}
6.3. Element Highlighting
6.3.1. Demo mode
In the demo mode actions on pages are marked with distinctive coloured frames around the element of the action. This mechanism is set by a property
# activate demo mode, default = false
tt.demomode=true
The following colours are used for highlighting
-
red: failed visibility checks and asserts
-
green: successful visibility checks and asserts
-
yellow: mouseOver
-
blue: click
6.3.2. Explicit Highlighting
For debugging purposes a GuiElement can call its highlight method to activate the demo mode and highlight the Element just for the current page.
GuiElement loginButton = new GuiElement(driver, By.id('login'));
loginButton.highlight();
// renders a green frame around the loginButton Element of the current Page
6.4. Expected Fails
For known issues on the SUT the annotation @Fails can used to mark a test method as failing. These test cases are marked as Expected failed separately in the report.
If tests are passed again, you get a note in the report to remove the Fails annotation.
@Test
@Fails()
public void testItWillFail() {
    Assert.assertTrue(false);
}|
The result is technically still a failure and only visually elevated to facilitate the evaluation of the report. Please keep in mind that
|
6.4.1. Add additional information
You can add additional information to describe the cause in more detail. All information are added to the report.
@Test
@Fails(description="This test fails for reasons")
public void testItWillFail() {
    Assert.assertTrue(false);
}| Attribute | Description |
|---|---|
description |
Give more details about the failure. |
ticketId |
Define a bug ticket ID as an int value ( |
ticketString |
Define a bug ticket ID or URL related to this failure. |
intoReport |
If |
validator |
Define a method that checks if the expected failure is valid. |
validatorClass |
Define a class for the |
validFor |
Define the conditions of the expected failed. ( |
6.4.2. Defining a validator
With expected fails validators, you can define if the Expected Failed state is valid or not.
When the validator returns true, the expected failed status is valid, otherwise, the test will result in a regular Failed.
You can use that feature to mark a test as expecting to fail for known circumstances, like browser or environment configurations.
You define a validator the following way:
public boolean browserCouldFail(MethodContext methodContext) {
    return methodContext.readSessionContexts()
                .map(SessionContext::getActualBrowserName)
                .anyMatch(s -> s.contains("internet explorer"));
}

@Test
@Fails(validator = "browserCouldFail")
public void testSomething() {
    // Perform your tests here
}
Or as a class
public class FailsValidator {
    public boolean expectedFailIsValid(MethodContext methodContext) {
        return true;
    }
}
@Test
@Fails(validatorClass = FailsValidator.class, validator = "expectedFailIsValid")
public void testSomething() {
// Perform your tests here
}6.4.3. Define conditions (@deprecated)
You can specify some conditions for expected fails. Only if all conditions are true, the test is marked as Expected failed, otherwise as Failed.
test.properties# test.properties
environment=test
country=de@Fails annotation@Test
@Fails(description = "Failing for environment 'test' and country 'de'", validFor = {"environment=test", "country=de"})
public void testExpectedFailed() {
Assert.fail();
}If the test is executed with other values of the properties (like country=uk) the test will marked as Failed.
6.5. Retry analyzer
Testerra provides an adjustable mechanism to automatically retry failed tests.
The default retry count is 1. Each failed method is executed exactly one more time, when matching the retry criteria.
Retried methods are shown in the section Retried of the report.
You can change the default with the following property.
tt.failed.tests.max.retries=1| The retry mechanism always ignores testcases with a valid Fails annotation. |
6.5.1. Specific retry count for test methods
You can change the retry count for specific test methods.
@Test()
@Retry(maxRetries = 2)
public void testMethod() {
    // ...
}
6.5.2. Default retries
The following default retry analyzers are registered from modules:
-
driver-uiregisteresWebDriverRetryAnalyzerwhich retries tests on specific internal WebDriver exceptions they look like temporary communication problems. -
driver-ui-desktopregisteresSeleniumRetryAnalyzerwhich retries tests on general Selenium communication problems with requested Desktop user agents:-
org.openqa.selenium.json.JsonException -
org.openqa.selenium.remote.UnreachableBrowserException
-
6.5.3. Specific retries
Testerra can also retry failed methods when matching certain criteria. The filtering process contains of checks of classes and messages matching the thrown Exception, which are set within the test.properties file.
# Set additional classes that engage a retry,
tt.failed.tests.if.throwable.classes=java.sql.SQLRecoverableException

# Set additional messages of Throwable that engage a retry,
tt.failed.tests.if.throwable.messages=failed to connect, error communicating with database
6.5.4. Customize retry behaviour
For further adjustment additional analyzers can be registered expanding the default behaviour.
InstantiationException// custom Retryanalyzers need to implement the functional interface AdditionalRetryAnalyzer
public class InstantiationExceptionRetryAnalyzer implements AdditionalRetryAnalyzer {
final String message = "failed instantiation";
@Override
public Optional<Throwable> analyzeThrowable(Throwable throwable, String tMessage) {
if (throwable instanceof InstantiationException) {
if (tMessage != null) {
final String tMessageLC = tMessage.toLowerCase();
boolean match = tMessageLC.contains(message);
if (match) {
return Optional.of(throwable);
}
}
}
return Optional.empty();
}
}public class AbstractTest extends TesterraTest {
static {
// register the additional Analyzer,
// which checks for "InstantiationException" and the message "failed instantiation"
RetryAnalyzer.registerAdditionalRetryAnalyzer(new InstantiationExceptionRetryAnalyzer());
}
}6.5.5. @NoRetry
With this annotation the Retry Analyzer won’t retry these methods if previously failed. This is characteristically shown in the report by the badge NoRetry.
You can customize the NoRetry annotation with the attributes name and color.
| Attribute | Description |
|---|---|
name |
Changes the shown text in the report. Default is |
color |
Change the background color of the shown text. Default is
|
NoRetry@Test()
@NoRetry(name = "No retry because it's not allowed.", color="rgb(255, 236, 139)")
public void testMethod() {
...
}6.6. WebDriverWatchDog
The WebDriverWatchDog is your vigilant pet watching the test execution and reacting on blocked tasks. With two properties it is set up.
# activate watchdog, default = false
tt.watchdog.enable = true

# timeout in seconds after the test execution is terminated, default = 300
tt.watchdog.timeout.seconds = 500
6.6.1. How does it work?
With the first Usage of WedDriverManager the WebDriverWatchDog is initiated.
It internally starts a Thread running in parallel to the current test execution checking the stacktrace every ten seconds for
stacktrace entries with thread name "Forwarding" containing an Element "java.net.SocketInputStream".
These potentially blocking stacktrace entries are updated every time found.
Upon reaching the maximum timeout of 500 seconds the whole test execution is terminated with exit code 99 and a readable error output in your log.
| A valid report is always generated. |
6.7. Annotations for Report adjustment
To improve the readability and clarity of the report there are several annotations for marking the test class and test methods, which are described in the following paragraphs as well as in @Fails, @Retry, @InDevelopment and @NoRetry.
6.7.1. @New (@deprecated)
This marks a test method as New, which is shown with this text in the report. Customization is possible with two attributes name and color in the annotation.
-
name: change the shown text in the report. Default is
New -
color: change the background color of the shown text. Default is
cadetblue. Values need to be valid for html colors.-
name of the color, e.g. red
-
RGB values, e.g. rgb(255, 236, 139)
-
RGBA values, e.g. rgba(252, 156, 249, 0.75)
-
HSL values, e.g. hsl(217, 97%, 57%)
-
Hex values, e.g. #57c0ff
-
6.7.2. @ReadyForApproval (@deprecated)
This marks a test method as Ready For Approval, which is characteristically shown with this text the report. Customization is possible with the two attributes name and color in the annotation.
-
name: change the shown text in the report. Default is
Ready For Approval -
color: change the background color of the shown text. Default is
indianred. Values need to be valid for html colors.
See @New for explanation.
6.7.3. @SupportMethod (@deprecated)
This marks a test method as Support Method, which is characteristically shown with this text the report. Retests won’t skip these methods if previously passed. Customization is possible with the two attributes name and color in the annotation.
-
name: change the shown text in the report. Default is
Support Method -
color: change the background color of the shown text. Default is
#848282. Values need to be valid for html colors.
See @New for explanation.
6.7.4. @TestClassContext
With this annotation you can set the test context for the given test class. There two attributes for adjustments.
-
name: name of the context, default =
"" -
mode:
TestClassContext.Mode.ONE_FOR_ALLorTestClassContext.Mode.ONE_FOR_EACH, default =TestClassContext.Mode.ONE_FOR_ALL
The Executed tests are then shown in the classes overview of the report as a entry labeled with name from @TestClassContext.
6.7.5. @InDevelopment (@deprecated)
This aforementioned annotations is further adjustable with the two attributes name and color.
-
name: change the shown text in the report. Default is
In Development -
color: change the background color of the shown text. Default is
#a7a5a5. Values need to be valid for html colors:-
name of the color, e.g. red
-
RGB values, e.g. rgb(255, 236, 139)
-
RGBA values, e.g. rgba(252, 156, 249, 0.75)
-
HSL values, e.g. hsl(217, 97%, 57%)
-
Hex values, e.g. #57c0ff
-
6.8. Dry Run
6.8.1. Overview
With this execution mode all methods marked with TestNG Annotations are only called but their code isn’t executed, hence the name dry run. It’s designed to simply check the callstack of TestNG related methods without executing their logic, e.g. to find missing method calls in your test setup. For using this you just need to set the following property.
# activate the dry run, default = false
tt.dryrun=true
The report indicates a dry run with the suffix Dry Run in the headlines of each section.
| The rest is visually identical to a normal run. |
All called methods are shown, but probably as passed. With a closer look into the report details you will just notice a really low test duration, something below one second.
6.9. JVMMonitor
The JVMMonitor is the Observer of the hardware utilization for memory and cpu.
With the start of a test while using the TesterraListener the latter implicitly starts the JVMMonitor.
Thus a concurrent thread for monitoring purposes only is initiated next to the actual test execution. Every ten seconds the following parameters are logged
-
JVM Memory usage in MB
-
JVM Memory reserved in MB
-
JVM CPU usage in per cent
The JVMMonitor is automatically terminated after the test execution and a graph showing the memory consumption is put into the report.
Testerra Features
7. Modules
7.1. BrowserUp Proxy
BrowserUp Proxy (BUP) is a simple HTTP proxy utility developed by browserup.com. It offers functionality to track, manipulate and modify HTTP requests and responses, as well as capture HTTP traffic for analysis.
Testerra offers a simple integration to spin multiple local proxy servers or manage remote proxy servers via HTTP API.
7.1.1. Project setup
compile 'io.testerra:bup:1.10'<dependencies>
<dependency>
<groupId>io.testerra</groupId>
<artifactId>bup</artifactId>
<version>1.10</version>
</dependency>
</dependencies>7.1.2. External Proxy Server
Best practice for using a Testerra with an external proxy, is to use a dedicated BrowserUp Instance. To start these instance, please have a further read on the BrowserUp documentation.
To handle remote a BrowserUp proxy instance Testerra provides a simple REST client (see also https://github.com/browserup/browserup-proxy#rest-api).
import eu.tsystems.mms.tic.testerra.bup.BrowserUpRemoteProxyManager;
import eu.tsystems.mms.tic.testerra.bup.BrowserUpRemoteProxyServer;
import eu.tsystems.mms.tic.testframework.testing.TesterraTest;
import org.openqa.selenium.Proxy;
import org.testng.annotations.AfterSuite;
import org.testng.annotations.BeforeSuite;

import java.net.MalformedURLException;
import java.net.URL;

public class AbstractTest extends TesterraTest {

    private static BrowserUpRemoteProxyServer bupProxy = new BrowserUpRemoteProxyServer();

    @BeforeSuite
    public void setupProxy() throws MalformedURLException {
        URL apiUrl = new URL("http://localhost:8080");
        BrowserUpRemoteProxyManager bupRemoteProxyManager
                = new BrowserUpRemoteProxyManager(apiUrl);
        bupProxybupRemoteProxyManager.startServer(bupProxy);

        /* Additional Proxy setup here */
        String bmpProxyAddress = String.format("%s:%d", apiUrl.getHost(), bupProxy.getPort());

        // For selenium usage.
        Proxy proxy = new Proxy();
        proxy.setHttpProxy(bmpProxyAddress).setSslProxy(bmpProxyAddress);

        WebDriverManager.setGlobalExtraCapability(CapabilityType.PROXY, proxy);
    }

    @AfterSuite
    public void tearDownProxy() throws MalformedURLException {

        URL apiBaseUrl = new URL("http://localhost:8080");
        BrowserUpRemoteProxyManager browserUpRemoteProxyManager
                = new BrowserUpRemoteProxyManager(apiBaseUrl);

        for (Integer proxyPort : browserUpRemoteProxyManager.getProxies()) {
            BrowserUpRemoteProxyServer bupToStop = new BrowserUpRemoteProxyServer();
            bupToStop.setPort(proxyPort);
            browserUpRemoteProxyManager.stopServer(bupToStop);
        }
    }
}
BrowserUp creates a new proxy server at the next free port beginning with port 8081 (BrowserUp default).
If you need a dedicated port, use startServer(BrowserUpRemoteProxyServer proxyServer) method the following way.
BrowserUpRemoteProxyServer browserUpRemoteProxyServer = new BrowserUpRemoteProxyServer();
browserUpRemoteProxyServer.setPort(8088);

browserUpRemoteProxyManager.startServer(browserUpRemoteProxyServer);
If the port already used, the BrowserUpRemoteProxyManager will do nothing, and just return the given config-object of type BrowserUpRemoteProxyServer.
Basic Auth
If your SUT is protected by HTTP basic auth, you can set up these credentials as following.
URL baseUrl = new URL(PropertyManager.getProperty("tt.baseurl"));
String basicAuthUser;
String basicAuthPassword;

URL apiBaseUrl = new URL(LOCAL_PROXY_FOR_TEST);
BrowserUpRemoteProxyManager browserUpRemoteProxyManager = new BrowserUpRemoteProxyManager(apiBaseUrl);
BrowserUpRemoteProxyServer bup1 = new BrowserUpRemoteProxyServer();
browserUpRemoteProxyManager.startServer(bup1);

browserUpRemoteProxyManager.setBasicAuth(bup1, baseUrl.getHost(), basicAuthUser, basicAuthPassword);
Upstream proxy
If you need to use a proxy to reach your SUT, you can set up BrowserUp proxy instance to use an upstream proxy.
BrowserUpRemoteProxyServer bup1 = new BrowserUpRemoteProxyServer();
bup1.setUpstreamProxy(ProxyUtils.getSystemHttpProxyUrl());

// Setup non-proxy for your upstream proxy, if needed
bup1.setUpstreamNonProxy(".internal.example.org|.mystuff.example.org");

BrowserUpRemoteProxyManager browserUpRemoteProxyManager = new BrowserUpRemoteProxyManager(apiBaseUrl);
browserUpRemoteProxyManager.startServer(bup1);
User info like username:password is supported in your upstream proxy URL.
|
Setup bind address
If running BrowserUp Proxy in a multi-homed environment, you can specify a desired server bind address.
BrowserUpRemoteProxyServer bup1 = new BrowserUpRemoteProxyServer();

// Setup a bind address, default is '0.0.0.0'
bup1.setBindAddress("192.168.100.1");

BrowserUpRemoteProxyManager browserUpRemoteProxyManager = new BrowserUpRemoteProxyManager(apiBaseUrl);
browserUpRemoteProxyManager.startServer(bup1);
Other features
/*
 Check if proxy alread runs on port...
 */
BrowserUpRemoteProxyManager browserUpRemoteProxyManager = new BrowserUpRemoteProxyManager(apiBaseUrl);

BrowserUpRemoteProxyServer bup1 = new BrowserUpRemoteProxyServer();
bup1.setPort(8088);

browserUpRemoteProxyManager.startServer(bup1);
boolean isRunning = browserUpRemoteProxyManager.isRunning(nup1);

/*
 Maps specific host names to another host names or IP adresses
 */
browserUpRemoteProxyManager.setHostMapping(BrowserUpRemoteProxyServer proxyServer, Map<String, String> hostMap);

/*
 Capture the traffic and return it as a JsonElement
 You can choose, if you want to capture only the headers, the content or both via the boolean flags.
 */
browserUpRemoteProxyManager.startCapture(
    BrowserUpRemoteProxyServer proxyServer,
    String initialPageRef,
    boolean isCaptureHeaders,
    boolean isCaptureContent
);
JsonElement stopCapture(BrowserUpRemoteProxyServer proxyServer);

/*
 Adds additional key-value pairs to the headers.
*/
browserUpRemoteProxyManager.addHeader(BrowserUpRemoteProxyServer proxyServer, String key, String value);
7.1.3. Local browser instances
If you want to quickly spin up a proxy isntance on your local system while testing, you can use the BrowserUpLocalProxyManager.
List<Integer> portPool = new ArrayList<>();
ports.add(8090);
ports.add(8091);
ports.add(8092);
ports.add(8093);
ports.add(8094);
ports.add(8095);

BrowserUpLocalProxyManager bupLocalManager = new BrowserUpLocalProxyManager(ports);

// Start instance
BrowserUpProxyServer browserUpProxyServer = new BrowserUpProxyServer();
bupLocalManager.startServer(browserUpProxyServer);

// assert that a port of given port pool was used.
Assert.assertTrue(portPool.contains(port), "Port of range was used.");

// assert proxy is started.
Assert.assertTrue(bup1.isStarted(), "Proxy started");
The local proxy manager works with a defined port pool, which has to be declared on instantiation of the manager class. This port pool will be used to spin up multiple proxy servers for a multi threading test execution.
The port pool has to be declared by yourself, respectively your code, because, only you can know which ports are currently free to use on your local test execution machine.
To use upstream proxies, add headers or do other things on the local proxy server, please take a closer look on BrowserUp documentation.
7.2. CSV Reader (deprecated)
This class is not supported anymore and therefore marked as @deprecated. If you want to read CSV files into Java beans, please consider the documentation of the OpenCSV library
|
The CSV reader class provides a basic reader for CSV files. This is useful to handle testdata. It provides two ways to read a csv file.
For all code examples we assume the following CSV files located in your project resource directory, e.g. src/test/resources.
id;name;firstName
AH_1;Muster;Max
AH_2;Paula;Paulid;name;firstName;subModel
AH_1;Muster;Max;SUB_1
AH_2;Paula;Paul;SUB_2id;street;city
SUB_1;Street A 12;Dresden
SUB_2;Street B 13;Leipzig7.2.1. Read file into map
With following code snippet you can read a CSV file into a simple key-value based map.
The values of the header row will be used as key. All other rows are then values of the given key.
final CSVTestDataReader csvTestDataReader = new CSVTestDataReader();

final List<Map<String, String>> testDataMap = csvTestDataReader.readCsvTestDataFromResource("testfiles/TestCsvReader.csv");

Assert.assertEquals(testDataMap.size(), 2);
Assert.assertEquals(testDataMap.get(0).get("id"), "AH_1");
Assert.assertEquals(testDataMap.get(1).get("id"), "AH_2");
7.2.2. Read files into beans
The other way to read a CSV file is to convert it into Java models. Therefore you have to specify the class matches the Java domain model pattern.
final CSVTestDataReader csvTestDataReader = new CSVTestDataReader();

final List<TestCsvReaderBean> testDataList = csvTestDataReader.readCsvIntoBeans("testfiles/TestCsvReader.csv", TestCsvReaderBean.class);

Assert.assertNotNull(testDataList);####
Assert.assertNotEquals(testDataList.size(), 0);

final TestCsvReaderBean testCSVReader = testDataList.get(0);
final String id = testCSVReader.getId();
Assert.assertEquals(id, "AH_1");
Further to this approach it is possible to concat objects like you do in your Java model as well.
Given the following classes and the given CSV, you will notice, that TestCsvReaderWithSubModel has a property of type TestCsvReaderSubModel.
In order to solve this, the CSV reader will try to find a CSV file named like your class TestCsvReaderSubModel in your resources.
If it exists, the CSV reader will read this "sub-file" as well and will inject the object into the main type.
Just ensure that you provide a unique line identifier. The CSV reader will then take care.
public class TestCsvReaderBeanWithSubModel {

    private String id;
    private String name;
    private String firstName;
    private TestCsvReaderSubModel subModel;

    // getter and setter here...
}public class TestCsvReaderSubModel {
private String id;
private String street;
private String city;
// getter and setter here...
}|
Simple data types must be represented by their object data types. E.g.
* |
7.2.3. Customize the CSV reader
The following table shows how you can customize the CSV reader.
| Method | Default value | Description |
|---|---|---|
|
0 |
Set the row of the hedaer in CSV file, beginning with 0. |
|
; |
Set the column separater. |
setQuoteChar(char quoteChar) |
\" |
Set the characters, how strings can be quoted. |
7.3. Layout Check
Layout tests always mean checking whether a GUI is designed according to the guidelines.
7.3.1. Introduction
Are the position, size, color and shape of the elements correct? Are distances maintained? Perhaps even certain elements are missing? In test automation, functionality is primarily tested. Here it is actually irrelevant how a button is designed and where it is positioned. The main thing is that the element can be uniquely recognized via XPath or CSS selectors.
However, in some frontends such as content management systems with a high level of relevance to end users (certain portal solutions, shops) the management is also extremely important. However, testing this with Selenium’s previous means is not in any relation between effort and benefit. Manual visual inspection is usually still the fastest way to do this.
Although, manual inspection can never be pixel-accurate. An inspection of perhaps more than 100 elements is too costly. Smaller shifts or colour deviations are easily overlooked.
At this point an automatic comparison of reference screenshots can help. This test is to be seen in addition to the functional tests, but cannot replace them. In a test case, it would also be conceivable to combine the check of function and layout.
7.3.2. Description
A layout test with the Testerra utilities is actually a comparison between a reference and the actual state. This is done via the screenshot functionality of Selenium, in which both screenshots (reference and actual) are compared pixel by pixel from top to bottom. In this comparison, a third image is created in which differences (ReferencePixel != ActualPixel) are marked in red. The LayoutCheck can perform a check in two ways:
-
PIXEL: Pixel-based image comparison of the entire reference image without exception. You get a quantified value for pixel displacement in percent (0-100%)
-
ANNOTATED: The image comparison is based on annotations in the reference image. The annotations are rectangles in a certain color, which include the areas to be checked. You get a quantified value for displaced annotations in percent.
Prerequisites
The following prerequisites must be met
-
Concrete execution environment: Layout tests should run in a concrete browser environment to ensure the comparability of the screenshots.
-
Size of browser window: Define fixed size to exclude different sizes of the images at different VM resolutions
-
Screen resolution and scaling: Make sure you have the same screen resolution and scaling on each presentation device (ea. Testerra uses a resolution of 1920x1200 (16:10) with a scaling of 1 per default in headless environments)
-
-
Build Server: The library underlying ANNOTATED mode supports the operating systems
-
Windows 32 - and 64 - Bit
-
Linux Debian 32 - and 64 - Bit (glibc >= 2.15; Jenkins)
-
MacOSX (untested)
-
7.3.3. Configuration
In order to get the layout check to work, you need at least a reference image and a place where it’s located.
tt.layoutcheck.reference.path=src/test/resources/layout-references/{tt.browser}
tt.layoutcheck.reference.nametemplate=%s.png

# Highly recommended to disable full screen for browser
tt.browser.maximize=false

# Highly recommended to switch of the demo mode for layout tests
tt.demomode=false
The directory for reference image may result in src/test/resources/layout-references/chrome/WelcomePage.png for example.
7.3.4. PIXEL Mode
The comparison is generally carried out over the entire reference image. In this case, it is a prerequisite that the reference screenshot and the screenshot created during the test runtime have the same resolution (height and width are identical).
Mostly the website consists of many more elements than should be checked. Ingredients such as the header,
menus or footer may falsify the test result if there are deviations from the reference,
but these are not currently the subject of the test. For this reason,
the tt.layoutcheck.use.ignore.color property can be used to determine that a particular color in the image can be excluded from comparison.
To validate the layout in Pixel Mode, you can check the whole page or a single GuiElement.
Check the whole page
import eu.tsystems.mms.tic.testframework.layout.LayoutCheck;
LayoutCheck.assertScreenshot(WebDriverManager.getWebDriver(), "WelcomePage", 1);
Check a single GuiElement
To check the layout of a single GuiElement only, you can use the standard asserts implementation.
import eu.tsystems.mms.tic.testframework.pageobjects.GuiElement;

final String guiElementImage = "HeaderComponent";
final GuiElement guiElement;
guiElement.asserts().assertScreenshot(guiElementImage, 10);
Take reference screenshots on first run
When you have configured the reference screenshots location and implemented the tests, you can now set the option
tt.layoutcheck.takereference=trueto enable taking automatically screenshots based on the current browser and size configuration and storing them to the reference image’s location.
All concrete distance values in this tt.layoutcheck.takereference-mode will return 0 (zero) and always pass the tests.
|
7.3.5. ANNOTATED Mode
For this mode, an arbitrary number of rectangles with a line width of one pixel are defined in the reference images. The color of the rectangles is to be communicated to Testerra via the upper left pixel (x=1, y=1). In the current screenshot, Testerra searches for the area within the annotated selection. The resolution of the current screenshot is irrelevant.
7.4. Localization
Websites come in many languages, where the functionality may not change, but labels of buttons, input or other interactive elements. Testerra provides an easy and simple way to support the localization of GuiElements.
7.4.1. Enable Unicode for your project
In build environments, where Unicode is not default, you should force to use it in your project by setting the Java compile options.
compileJava.options.encoding = 'UTF-8'
compileTestJava.options.encoding = "UTF-8"<project.build.sourceEncoding>UTF-8</project.build.sourceEncoding>For Gradle, you should also set your system-wide or local gradle.properties.
systemProp.file.encoding=utf-87.4.2. Add localization resource bundle
The localization is based on Unicode .properties files loaded during runtime.
To add such files, create a new resource bundle lang in src/main/resources and add all required locales.
BTN_LOGIN=LoginBTN_LOGIN=Anmelden
You can change the default encoding for .properties files in IntellJ at File → Settings → File Encodings
|
7.4.3. Access localization text
Now you can instance GuiElements by localized strings.
import eu.tsystems.mms.tic.testframework.l10n.SimpleLocalization;

GuiElement loginBtn = new GuiElement(By.linkText(SimpleLocalization.getText("BTN_LOGIN")));
SimpleLocalization uses Locale.getDefault() by default, but
you can switch the default locale the following way.
LocalizedBundle defaultBundle = SimpleLocalization.setDefault(Locale.GERMAN);7.4.4. Session based localization
For thread-safe localization, you can use session based localization by initializing your localized bundles based on the session’s locale.
Locale sessionLocale = WebDriverManager.getSessionLocale(WebDriver).orElse(Locale.getDefault());

LocalizedBundle sessionBundle = new LocalizedBundle("testdata", sessionLocale);
sessionBundle.getString("TEST_KEY");
When the SUT locale changes, you should also set the session’s locale:
public class LocalizedPage extends Page {

    public void switchLocale(Locale locale) {
        // Implement your language switch here
        // ...

        // Don't forget to set the sessions locale
        WebDriverManager.setSessionLocale(getWebDriver(), locale);
    }
}
7.4.5. Change runtime locale
The best way to change the locale for your tests is, to pass the language property as command line argument.
gradle test -Duser.language=deFor Maven, you need some extra configuration
<project>
    <properties>
        <user.language>de</user.language>
        <user.country>DE</user.country>
        <argLine>-Duser.language=${user.language} -Duser.country=${user.country}</argLine>
    </properties>
</project>
before running the command
mvn test -Duser.language=de -Duser.country=DE7.4.6. Change browser locale
The WebDriver API official doesn’t support changing the language of a browser session. But there exists non-standard or experimental ways on Stackoverflow to change your browser locale.
Anyways, it’s currently the better way to visit your SUT with an undefined language and change it there with the ability it’s providing for that.
7.5. Mail connector
The module mail-connector allows you to send and receive/read emails as well as solve mail surrounding tasks like encoding or encrypting.
7.5.1. Project setup
Latest release

// build.gradle
compile 'io.testerra:mail-connector:1.10'<!-- pom.xml -->
<dependencies>
<dependency>
<groupId>io.testerra</groupId>
<artifactId>mail-connector</artifactId>
<version>1.10</version>
</dependency>
</dependencies>Configuration Parameters
All MailConnector classes need parameters to connect to the corresponding server. These are set within the mailconnection.properties file or by system properties. The following parameters must be set.
#SMTP
SMTP_SERVER=smtp.mailserver.com
SMTP_SERVER_PORT=25
SMTP_USERNAME=user
SMTP_PASSWORD=password

#POP3
POP3_SERVER=pop.mailserver.com
POP3_SERVER_PORT=110
POP3_FOLDER_INBOX=inbox
POP3_USERNAME=user
POP3_PASSWORD=password

# IMAP
IMAP_SERVER=imap.mailserver.com
IMAP_SERVER_PORT=143
IMAP_FOLDER_INBOX=INBOX
IMAP_USERNAME=user
IMAP_PASSWORD=password

# TIMING for POP3 and IMAP
# sets the timeout between polls, default = 50s
POLLING_TIMER_SECONDS=10
# sets the maximum number of polls, default = 20
MAX_READ_TRIES=20
If you want to use an SSL-encrypted connection, you need to set SMTP_SSL_ENABLED / POP3_SSL_ENABLED to true. The ports must then be adjusted according to the server.
The actual connection to the mail server is implicitly opened within each MailConnector class.
7.5.2. POP3MailConnector
The POP3MailConnector provides access to a POP3 server. Emails are read and processed by using methods of the superclass AbstractInboxConnector. Specific mails can be extracted with serverside filtering by matching given criteria expressed with SearchTerm (see JavaMail API)
POP3MailConnector pop3MailConnector = new POP3MailConnector();

// wait until the email with subject 'test' arrived in the InboxFolder
EmailQuery query = new EmailQuery().setSearchTerm(new SubjectTerm(subject));
Email email = pop3MailConnector.query(query).findFirst().get();

// delete all emails with this subject from the server while setting timeout and max number of polls explicitly
query.setRetryCount(5);
query.setPauseMs(2000);

Email email = pop3MailConnector.query(query).findFirst().get();

// delete mails matching the given criteria
String recipient = email.getRecipients().get(0));
String subject = email.getSubject();
String messageId = null;

pop3MailConnector.deleteMessage(recipient, RecipientType.TO, subject, messageId);// wait until the email with subject 'test' arrived in the InboxFolder
EmailQuery query = new EmailQuery().setSearchTerm(new SubjectTerm(subject));
Email email = pop3MailConnector.query(query).findFirst().get();
try {
Multipart content = (Multipart) email.getMessage().getContent();
int contentCnt = content.getCount();
String attachmentFileName = null;
for (int i = 0; i < contentCnt; i++) {
Part part = content.getBodyPart(i);
// Retrieve attachment
if (part.getDisposition().equals(Part.ATTACHMENT)) {
attachmentFileName = part.getFileName();
}
}
} catch (IOException e) {
e.printStackTrace();
} catch (MessagingException e) {
e.printStackTrace();
}7.5.3. SMTPMailConnector
This entity allows sending emails via the SMTP protocol.
SMTPMailConnector smtpMailConnector = new SMTPMailConnector();

// send a created message
MimeMessage createdMessage = new MimeMessage(session);
try {
    msg.addRecipients(RecipientType.TO, RECIPIENT);
    msg.addFrom(new Address[]{new InternetAddress(SENDER)});
    msg.setSubject("testerra");
    msg.setText("mail text");
} catch (MessagingException e) {
    LOGGER.error(e.toString());
}
smtpMailConnector.sendMessage(createdMessage);

// send an existing message
MimeMessage existingMessage = MailUtils.loadEmailFile("test-mail.eml");
smtpMailConnector.sendMessage(existingMessage);
7.5.4. ImapMailConnector
The ImapMailConnector operates like the POP3MailConnector with an additional method to mark all mails as seen.
ImapMailConnector imapMailConnector = new ImapMailConnector();

EmailQuery query = new EmailQuery().setSearchTerm(new SubjectTerm(subject));
imapMailConnector.query(query).findFirst().ifPresent(email -> {
    // EMail found
});

// mark all mails in inbox as seen
imapMailConnector.markAllMailsAsSeen();

// delete all mails in inbox
imapMailConnector.deleteAllMessages();
7.5.5. Get simply the message count
You can get the message count for the inbox, of a specified folder name.
connector.getMessageCount();
connector.getMessageCount("FolderName");
7.5.6. SSL settings and trusting hosts for self-signed certificates
SSL is enabled per default for POP3 and IMAP and can be configured via. properties.
IMAP_SSL_ENABLED=false
POP3_SSL_ENABLED=false
SMTP_SSL_ENABLED=true
The MailConnector uses Certificate Utilities for trusting hosts.
7.5.7. Custom configuration
You can set properties to the JavaMail framework like:
connector.configureSessionProperties(properties -> {
    properties.put("mail.imaps.auth.ntlm.disable", true);
});
See the original documentation for more information: * IMAP: https://eclipse-ee4j.github.io/mail/docs/api/com/sun/mail/imap/package-summary.html * SMTP: https://eclipse-ee4j.github.io/mail/docs/api/com/sun/mail/smtp/package-summary.html * POP3: https://eclipse-ee4j.github.io/mail/docs/api/com/sun/mail/pop3/package-summary.html
7.5.8. Debugging the MailConnector
Enable the debug mode programatically
connector.getSession().setDebug(true);or via Properties
DEBUG_SETTING=true7.5.9. Best Practices
Combine search terms
You can combine search terms the following way
EmailQuery query = new EmailQuery();

query.withAllOfSearchTerms(
    new SubjectTerm("My Subject"),
    new ReceivedDateTerm(DateTerm.EQ, new Date())
);

// or
SearchTerm oneOf = new OrTerm(
    new SubjectTerm("My Subject"),
    new SubjectTerm("PetsOverNight.com"),
);
query.setSearchTerm(oneOf);

// or
List<SearchTerm> searchTerms = new ArrayList<>();
searchTerms.add(oneOf);
searchTerms.add(new ReceivedDateTerm(DateTerm.EQ, new Date()));
query.withAllOfSearchTerms(searchTerms);
Find emails by specified date
To find emails for a specified date, you should combine the SentDateTerm and an explicit filter, because the internal library is not able to filter by exact
date with the IMAP protocol.
EmailQuery query = new EmailQuery();
Date now = new Date();

// Query emails that arrived today
query.setSearchTerm(new SentDateTerm(ComparisonTerm.GE, now));

connector.query(query)
    .filter(email -> email.getSentDate().after(now))
    .forEach(email -> {
        // EMail found
    });
7.5.10. MailUtils
This helper class contains methods which facilitate reoccurring tasks when working with mails, e.g. encrypting, decrypting, and comparing mails.
String pahtKeyStore = "your/path/to/cacert.p12";
String password = "123456";
String subject = "test";
String sentContent = "Testerra Testmail"

SMTPMailConnector smtpMailConnector = new SMTPMailConnector();
Session session = smtpMailConnector.getSession();

MimeMessage sentMessage = new MimeMessage(session);
sentMessage.setText(sentContent);
sentMessage.setSubject(subject);

// encrypt message
MimeMessage encryptedMsg = MailUtils.encryptMessageWithKeystore(sentMessage, session, pahtKeyStore, password);

smtpMailConnector.sendMessage(encryptedMsg);
Email receivedMsg = waitForMessage(subject);

// compare Mails and verify difference due to encryption
boolean areContentsEqual = MailUtils.compareSentAndReceivedEmailContents(sentMessage, receivedMsg);
Assert.assertFalse(areContentsEqual);

// decrypt message
MimeMessage decryptedMsg = MailUtils.decryptMessageWithKeystore(encryptedMsg, session, pahtKeyStore, password);
// verify receivedContent is equal to sentContent
String receivedContent = ((Multipart) decryptedMsg.getContent()).getBodyPart(0).getContent().toString();
Assert.assertEquals(receivedContent, sentContent);
7.6. PropertyManager
The PropertyManager provides a static interfaces for reading properties.
String property = PropertyManager.getProperty("my.property", "default");It will look for the property definition appearance in the following order.
-
PropertyManager.getTestLocalProperties() -
System.getProperties() -
test.properties
When it’s still not defined, in will fall back to the given default value.
7.6.1. Property files
Testerra supports and loads automatically .properties files located under test/resources.
The test.properties is called the Test Configuration and contains everything required by the test, like Browser setup, SUT credentials or Layout test thresholds.
When a system.properties exists, Testerra loads and sets the given properties via System.setProperty() if they are not present already.
| You cannot override system properties given by command line. |
The path of this file can be changed by tt.system.settings.file and will be automatically loaded with the following message
common.PropertyManager - Load system properties: /path/to/your/system.properties
7.7. Connectors
While using the framework some external connectors could be useful. The maintainers provide some of them in separate repositories. Please take a look at the following list if there is a connector mapping your need.
| Name | Description |
|---|---|
Uses the open source standard Appium to run web tests based on Testerra on mobile devices. |
|
Automatic test result synchronization for Microsoft AzureDevOps platform. |
|
Provides the opportunity to use Cucumber and Gherkin to specify |
|
Automatic test result synchronization to HP Application Lifecycle Management, former called HP QualityCenter. |
|
Using a Selenium Grid based on Selenoid this module provides access to videos and VNC streams. |
|
A simple notification service for Jetbrains TeamCity. |
|
Automatic test result synchronization Jira XRay. |


8. Utilities
8.1. Assert Utilities
This class provides some extra assertion methods for TestNG:
AssertUtils.assertContains("Hello World", "Martin", "Greeting");
// Greeting [Hello World] contains [Martin] expected [true] but found [false]

AssertUtils.assertContainsNot("Hello World", "World", "Greeting");
// Greeting [Hello World] contains [World] expected [false] but found [true]

AssertUtils.assertGreaterEqualThan(new BigDecimal(2), new BigDecimal(4), "High number");
// High number [2] is greater or equal than [4] expected [true] but found [false]

AssertUtils.assertLowerThan(new BigDecimal(2), new BigDecimal(-1), "Low number");
// Low number [2] is lower than [-1] expected [true] but found [false]
8.2. Certificate Utilities
You can trust specified hosts in a whitespace separated list like
tt.cert.trusted.hosts=example.com google.comOr just trust any (not recommended)
tt.cert.trusted.hosts=*You can also configure this programatically like
CertUtils certUtils = CertUtils.getInstance();
String trustedHosts[] = {"t-systems.com"};
certUtils.setTrustedHosts(trustedHosts);
certUtils.setTrustAllHosts();
This will configure accepting certificates where possible:
-
User agents
ACCEPT_INSECURE_CERTScapability -
All internal APIs that use
HttpsURLConnectionlikeFileDownloaderorMailConnector
You can also set defaults for all created SSLSocketFactory and HostnameVerifier.
// Trust all certificates in the current Java VM instance.
certUtils.makeDefault();
8.3. Desktop WebDriver utilities
This utility class provides some additional methods to interact with web elements.
All methods using JavaScript snippets to execute an action instead the Selenium way.
|
Please consider this utility class as a fallback solution. It could be useful if elements are hidden or not reachable by Selenium. |
8.3.1. Supported actions
GuiElement element = new GuiElement(driver, By.id("label"));
DesktopWebDriverUtils utils = new DesktopWebDriverUtils();

utils.clickJS(element);
The following methods are supported:
-
clickJS()
-
rightClickJS()
-
doubleClickJS()
-
mouseOverJS()
-
clickAbsolute()
-
mouseOverAbsolute2Axis()
See Mouse over for more details about the mouseOverAbsolute2Axis method.
8.3.2. mouseOver vs. mouseOverAbsolute2Axis
The mouseOverAbsolute2Axis method does not move the mouse pointer relativly from the last position.
The following graphic shows 2 different mouse pointer paths beginning at the upper right image to the button 1.
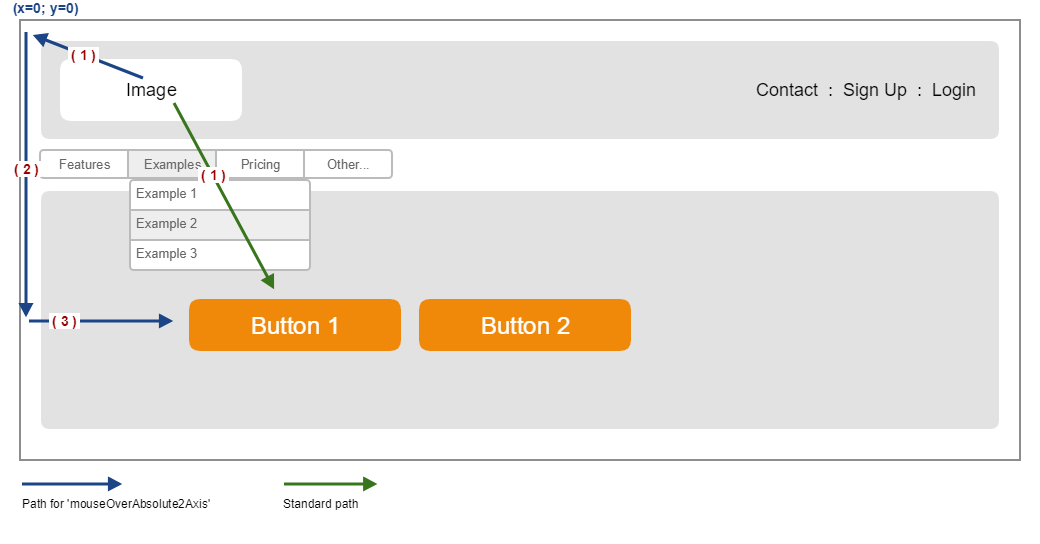
The standard path (green) goes over a menu with hover effects. This could hide your target element. The blue path variant always goes first to the point (0,0) of the viewport, then in x and y direction the the target element.
8.4. JavaScript Utilities
JSUtils provide some helper methods to inject and execute JavaScript code via WebDriver.
8.4.1. Execute JavaScript
Sometimes in automated testing for web applications you want to access your system under test by JavaScript or you just want to implement a code snippet to run custom validations. For example, Testerras Demo mode will use this behaviour to highlight elements while asserting or typing to visualize current actions.
final WebDriver driver = WebDriverManager.getWebDriver();
final GuiElement hiddenUploadField = new GuiElement(driver, Locate.by().id("hidden-upload-field"));
hiddenUploadField.asserts().assertIsPresent();

// will change style to display a hidden element
JSUtils.executeScript(driver, "arguments[0].setAttribute('style', 'display:block; opacity: 1')", hiddenUploadField.getWebElement());
8.4.2. Inject JavaScript
For executing more than a single line of JavaScript code it is recommended to write a JavaScript file and store it in src/main/resources or src/test/resources directory.
Then you can inject the full JavaScript file with following method.
final WebDriver driver = WebDriverManager.getWebDriver();

// WebDriver, Path to resource file, id of the script-tag
JSUtils.implementJavascriptOnPage(driver, "js/inject/custom.js", "customJs");
Testerra will then inject your resource file into the current DOM of your WebDriver instance according to the template.
<script id="customJs" type="text/javascript">
    // your javascript code here.
</script>
8.5. Download Utilities
8.5.1. FileDownloader
The FileDownloader utility provides methods for downloading resources from web sites. It uses the default proxy configuration.
// define the url where to download the resource from
String downloadUrl = "https://upload.wikimedia.org/wikipedia/commons/thumb/0/0a/"+
	"S%C3%A5g_med_arm_av_valn%C3%B6t_-_Skoklosters_slott_-_92588.tif/"+
	"lossy-page1-1024px-S%C3%A5g_med_arm_av_valn%C3%B6t_-_Skoklosters_slott_-_92588.tif.jpg";

// construct the downloader
FileDownloader downloader = new FileDownloader();

// perform the download
File downloadFile = downloader.download(downloadUrl);

System.out.println("downloaded file exists:" + downloadFile.exists());CertUtils certUtils = new CertUtils();
certUtils.setTrustAllHosts(true);
DefaultConnectionConfigurator connectionConfigurator = new DefaultConnectionConfigurator();
connectionConfigurator.useCertUtils(certUtils);
connectionConfigurator.immitateCookiesFrom(WebDriver)
FileDownloader downloader = new FileDownloader();
downloader.setConnectionConfigurator(connectionConfigurator);
downloader.setDownloadLocation("/some/directory");
downloader.setProxy(new Proxy(Proxy.Type.HTTP, new InetSocketAddress("123.0.0.1", 8080)));downloader.cleanup();8.6. PDF Utilities
This is an utility class for extracting text content of PDF documents for verifications.
// reads text from a file given by a filename (absolute path of file).
String textFromPdf = PdfUtils.getStringFromPdf(String pdfFileLocation);
//reads text from a pdf given as input steam.
String textFromPdf = PdfUtils.getStringFromPdf(InputStream stream);8.7. Proxy Utilities
This is a static helper class based for reading the proxy configuration from system properties.
import java.net.URL;
import eu.tsystems.mms.tic.testframework.utils.ProxyUtils;

// Format e.g.: http://{http.proxyHost}:{http.proxyPort}
URL httpProxyUrl = ProxyUtils.getSystemHttpProxyUrl();
URL httpsProxyUrl = ProxyUtils.getSystemHttpsProxyUrl();
8.8. UITest Utilities
The UITestUtils supports you to generate additional screenshots.
You can add the screenshots into the report to the method steps.
@Test
public void testDemo() {
    UITestUtils.takeScreenshot(WebDriverManager.getWebDriver(), true);
}class ExamplePage extends Page {
public void doAnything() {
UITestUtils.takeScreenshot(this.getWebDriver(), true);
}
}You can also store a simple screenshot to your project directory.
@Test
public void testDemo() {
    ...
    // FileSystems.getDefault() returns the current working directory
    File path = FileSystems.getDefault().getPath("screen.png").toFile();
    UITestUtils.takeWebDriverScreenshotToFile(WebDriverManager.getWebDriver(), path);
    ...
}| Screenshots are always saved in the PNG image format. |
8.9. Timer Utilities
The timer utilities mainly provide two important classes for you.
8.9.1. TimerUtils
If you want to pause your current test execution, because you may have to wait for something or need a hard timeout you can use the TimerUtils.
// Will pause current thread for 1 second.
TimerUtils.sleep(1000);

// You can pass a comment as well
TimerUtils.sleep(5000, "Wait for something to happen.");
Both of these methods calls of sleep() will produce a log message.
If you want to sleep without a message, TimerUtils of Testerra provides a method sleepSilent().
8.9.2. Timer
The Timer provides a basic timer feature, if you have to execute the same snippet of code in a defined interval. It stops after timeout or your sequence code was executed without any exceptions. If your sequence code was not successful the Timer will occur a TimeoutException.
final Timer timer = new Timer(500, 15_000);
timer.executeSequence(new Timer.Sequence<Boolean>() {
    @Override
    public void run() throws Throwable {
        // sequence code here
    }
});|
With this approach you will block your current thread, mostly your main thread. If you want to execute your |
You can also return an object. In that case no TimeoutException will occur. Therefor you have to verify your returning object.
public MyObject runTimer() {
    final Timer timer = new Timer(500, 15_000);
    ThrowablePackedResponse<MyObject> myObjectResponse
        = timer.executeSequenceThread(new Timer.Sequence<MyObject>() {
        @Override
        public void run() throws Throwable {
            // sequence code here
            setPassState(boolean);  // exit the sequence if your condition is true before timeout
            setReturningObject(new MyObject());

        }
    });
    return myObjectResponse.getResponse();
}
8.10. WebDriver Utilities
8.10.1. Keep a session alive
Sometimes when interacting with a remote selenium grid provider you will get in touch with the given session timeout of the provider. If your session is idle, the grid provider will close your session due to resource reasons after a timeout set by the provider itself. This is a helpful feature for selenium grid providers, but maybe you just want to set your WebDriver session on hold, because you are interacting with some other WebDriver session in the same thread.
To keep a session alive while processing some other tasks in the main thread you have to send some interactions. For this you can use the managed methods in Testerra framework. This will help you to get your things done and will ensure that you can’t keep sessions alive forever to avoid grid abuse.
WebDriver driver = WebDriverManager.getWebDriver();
// Do some test stuff with session your session

// Starting a second session for example to test concurrent interactions.
WebDriver driverWithOtherUser = WebDriverManager.getWebDriver("Session2");

// Keep alive driver while doing actions on driverWithOtherUser for 90 seconds, while refreshing all 10 seconds
final WebDriverKeepAliveSequence webDriverKeepAliveSequence = WebDriverUtils.keepWebDriverAlive(driver, 10, 90);

// Do your things with your second driver

// NOTE: Please release your WebDriverKeepAliveSequence as you dont need the lock
WebDriverUtils.removeKeepAliveForWebDriver(driver);
Extending Testerra
9. Extending Testerra
Testerra provides several ways for extensions.
9.1. Hooks
The interface ModuleHook of Testerra framework offers you an entry point to extend the framework and register listeners, add workers or apply filters to methods.
All you have to do is to implement the interfaces ModuleHook.init() and ModuleHook.terminate() methods.
Testerra will then search for all present implementations of ModuleHook in the class path and will register it.
While the init() method is called on startup of Testerra as one of the earliest steps, you are able to make your customizations as soon as possible and you are able to register to all [Events and Listener] of Testerra framework as well.
The terminate() method of your custom module hook is called at the most latest point for Testerra right before terminating the execution.
You should use this method to cleanup your module, if necessary, for example closing database connections in a database module.
import eu.tsystems.mms.tic.testframework.hooks.ModuleHook;

public class SimpleCustomHook implements ModuleHook {

    @Override
    public void init() {
        //
    }

    @Override
    public void terminate() {
        //
    }
}
9.2. Events and Listeners
Testerra provides a Google Guava event bus with custom events for test execution. The following events are currently implemented:
| Event | Description |
|---|---|
|
Called on start of every test method annotated by TestNG |
|
Called at the end of every test method annotated by TestNG |
|
Called at the end of test run to trigger report generation and other output worker. |
|
Called on test run abortion due to unclear circumstances like hanging sessions, JVM exit or other. |
|
Called before suite execution. The events methods list provides a list of tests to execute. Read more about this in Intercept test method execution |
|
Called every time the internal context data has been changed significantly. This can be used to synchronize the internal test context model. |
|
Called on the very end of the test execution when the execution model has been finalized. Use this event to generate a report. |
9.2.1. Create custom event listeners
The simplest way to get in touch with the event bus is to write and register your own implementation of the event’s Listener interface and add the @Subscribe annotation.
import com.google.common.eventbus.Subscribe;
import eu.tsystems.mms.tic.testframework.events.MethodStartEvent;
import eu.tsystems.mms.tic.testframework.logging.Loggable;

public class LogEventListener implements MethodStartEvent.Listener, Loggable {

    @Override
    @Subscribe
    public void onMethodStart(MethodStartEvent event) {
        log().info("Event logged: " + event.getMethod());
    }
}
If you want to react to some more events, you can just implement multiple interfaces.
9.2.2. Register custom event listener
After you defined your first custom listener you now have to register it to the TesterraListener.
TesterraListener.getEventBus().register(new LogEventListener());9.2.3. Fire events by yourself
While Implementing your own module you may reach a point, where you want to inform other components or modules about an important event. You can achieve this by just posting this event to the bus.
For example, if your module changes some data in the underlying data model, you have to inform all other "participants" about your change by firing an ContextUpdateEvent event.
// Update some data in data model...
methodContext.name = "new_Test_Method_Name";

TesterraListener.getEventBus().post(new ContextUpdateEvent().setContext(methodContext));
9.2.4. Create custom event types
If you want to provide some custom events to other modules. You can implement these by implementing any kind of class for the event bus.
public class CustomEvent {
    public interface Listener {
        void onCustomEvent(CustomEvent event);
    }
}
With your CustomEvent created, you now can fire these events or react to them in the way described in the sections Fire events by yourself and Create custom event listeners.
@Override
@Subscribe
public void onCustomEvent(CustomEvent event) {
   log().info("Custom Event started!");
}
9.2.5. Intercept test method execution
With the test InterceptMethodsEvent, you are able to modify the list of tests being executed before execution.
import eu.tsystems.mms.tic.testframework.events.InterceptMethodsEvent;

public class MyTest extends TesterraTest {

    public class MyListener implements InterceptMethodsEvent.Listener {

        @Override
        @Subscribe
        public void onInterceptMethods(InterceptMethodsEvent event) {
            event.getMethodInstances().removeIf(iMethodInstance -> true);
        }
    }

    @BeforeTest
    public void setupListener() {
        TesterraListener.getEventBus().register(new MyListener());
    }
}
9.2.6. Listen to TestNG events
Since the TesterraListener listens to TestNG events, it also forwards some of these events the same way like any other events.
import eu.tsystems.mms.tic.testframework.logging.Loggable;
import com.google.common.eventbus.Subscribe;
import org.testng.ISuite;
import org.testng.ISuiteListener;

class MySuiteListener implements ISuiteListener, Loggable {

    @Subscribe
    @Override
    public void onStart(ISuite suite) {
        log().info("Suite started");
    }
}
9.3. Create a report
When you want to create a custom report, you have to add the report-model module as a dependency to your module and listen to the FinalizeExecutionEvent.
import com.google.common.eventbus.Subscribe;
import eu.tsystems.mms.tic.testframework.events.FinalizeExecutionEvent;
import eu.tsystems.mms.tic.testframework.logging.Loggable;

public class GenerateReportListener implements FinalizeExecutionEvent.Listener, Loggable {

    @Override
    @Subscribe
    public void onFinalizeExecution(FinalizeExecutionEvent event) {
        log().info("Generate report");
    }
}
9.3.1. Generate the protobuf report model
Testerra ships Google Protobuf model adapters for the internal context model.
You can automatically generate all the models during the execution, when you register the AbstractReportModelListener in your module hook.
import com.google.common.eventbus.EventBus;
import eu.tsystems.mms.tic.testframework.listeners.AbstractReportModelListener;
import eu.tsystems.mms.tic.testframework.hooks.ModuleHook;
import eu.tsystems.mms.tic.testframework.report.TesterraListener;

public class CustomReportModuleHook implements ModuleHook {

    @Override
    public void init() {
        Report report = new Report();
        EventBus eventBus = TesterraListener.getEventBus();
        eventBus.register(new GenerateReportModelListener(report.getReportDirectory()));
    }
}
This will generate Protobuf models in test-report/models.
Appendix
10. Best Practices
This section contains several articles for best practices for the usage and implementation of tests with Testerra.
10.1. Browser specific knowledge
10.1.1. Firefox
Prevent Firefox download confirmation dialog
FirefoxOptions firefoxOptions = new FirefoxOptions();
// You have to add every mimetype you want no confirmation for
firefoxOptions.addPreference("browser.helperApps.neverAsk.saveToDisk", "application/zip");
firefoxOptions.addPreference("browser.download.manager.showAlertOnComplete", false);
firefoxOptions.addPreference("browser.download.manager.showWhenStarting", false);
10.1.2. Chrome
Chrome in a container
If using Selenium with Chrome in a Docker container it may comes to some random WebDriverException, because of some internal container limits.
If you are getting random `selenium.common.exceptions.WebDriverException: Message: unknown error: session deleted because of page crash, may this code snippet will solve your problem, by disabling the usage of dev/shm memory and enabling the usage of /tmp instead.
This will may slow down your execution time, because you are using disk instead of memory.
The reason is, that chrome / chrome driver leads to errors when /dev/shm is too small.
@BeforeSuite
void configureChromeOptions() {
    WebDriverManager.setUserAgentConfig(Browsers.chromeHeadless, new ChromeConfig() {
        @Override
        public void configure(ChromeOptions options) {
            options.addArguments("--disable-dev-shm-usage");
        }
    });
}
10.1.3. Internet Explorer
Skip certificate warning page
When testing websites with own certificates you may encounter issues and warning pages in each browser you use. For Chrome or Firefox these warnings can be skipped by setting properties, but for the Internet Explorer you have to define a small helper method, that you can call right after opening the base url.
public void skipInternetExplorerSecurityWarning(WebDriver driver, boolean handleAlert) {
    driver.navigate().to("javascript:document.getElementById('overridelink').click()");
    if (handleAlert) {
        driver.switchTo().alert().accept();
    }
}
10.2. Always describe your asserts
In that specific case where you can’t use asserts(), then use the extended Assert Utilities to more precise in your statement and pass a proper description text.
int actualSearchResultCount = Integer.parseInt(element.getText());

// Good practice
AssertUtils.assertGreaterThan(actualSearchResultCount, 5, "Search results count");

// Bad practice
Assert.assertTrue(actualSearchResultCount > 5);
10.3. Working with HTML elements
10.3.1. Radio buttons
Since radio buttons share the same name, as the following example shows
<input type="radio" name="beverage" value="tee">
<input type="radio" name="beverage" value="coffee">
It’s not a good practice to select it By.name.
Its better to select both options separately.
// Good practice
Locate locator = Locate.prepare("//input[@name='%s' and @value='%s']").unique();
GuiElement teeOption = new GuiElement(driver, locator.with("beverage", "tee"));
GuiElement coffeeOption = new GuiElement(driver, locator.with("beverage", "coffee"));

// Bad practice
GuiElement options = new GuiElement(driver, By.name("beverage"));
10.3.2. Shadow Roots
| Working with Shadow Roots and Shadow DOM elements is not supported by Selenium. It’s a highly-experimental feature and not all browsers can work well with these elements in browser automation. The best browser by our experience is a chromium-based browser. |
Modern web applications are allowed to use some third-party components, which can be integrated with Shadow DOM. This is the modern art of an iframe, because the components will be loaded via asynchronous JavaScript.
Each embedded Shadow DOM component will have its own shadow root.
To work with shadow root elements Testerra provide the method shadowRoot() on the GuiElement class.
Given the following HTML code snippet it will be easier how to get the corresponding GuiElement of the Shadow DOM component.
<body>
    <div id="wrapper">
    <!-- HTML code-->
    <my-custom-shadow-root-element>
    <!-- #shadowRoot -->
        <div class="custom-component">
            <input id="custom-component-login-name" name="name">
        </div>
    </my-custom-shadow-root-element>
    </div>
    <!-- HTML code-->
</body>WebDriver driver = WebDriverManager.getWebDriver();
GuiElement shadowRootElement = new GuiElement(driver, By.cssSelector("my-custom-shadow-root-element")).shadowRoot();
GuiElement inputName = shadowRootElement.getSubElement(By.xpath("//*[@id='custom-component-login-name']"));
Calling isDisplayed() on shadowRoot()-notated GuiElement will always return false, but isPresent() will work as designed.
|
Because of technical limitations and internal handling of browser-different access to Shadow DOM elements, it is not possible to use any other selector type than By.xpath() working with getSubElement() on a shadow root.
|
10.4. Support multiple profiles
Supporting multiple profiles is useful, for different environments or test suites.
test {
    def profiles = [
        "mySuite": "suite.xml"
    ]

    def suiteFiles = []
    profiles.each { k, v ->
        if (project.hasProperty("" + k)) {
            def f = 'src/test/resources/' + v
            suiteFiles << f
        }
    }

    useTestNG() {
        suites(suiteFiles as String[])
    }
}<project>
<profiles>
<profile>
<id>mySuite</id>
<build>
<plugins>
<plugin>
<artifactId>maven-surefire-plugin</artifactId>
<configuration>
<skip>false</skip>
<suiteXmlFiles>
<suiteXmlFile>src/test/resources/suite.xml</suiteXmlFile>
</suiteXmlFiles>
</configuration>
</plugin>
</plugins>
</build>
</profile>
</profiles>
</project>gradle test -PmySuitemvn test -PmySuite10.5. Test on multiple environments
If you run your tests on multiple test environments, you need for every environment a specific set of settings, for example another tt.baseurl or tt.browser.
10.5.1. Define your properties
Your test.properties describes your default setting. If you want to change some properties, you can define another property file and locate it into the resource folder.
tt.browser=chrome
tt.baseurl=http://example.orgtt.browser=firefox
tt.baseurl=http://qa.example.org10.5.2. Load specific properties at startup
Load your custom property file at test startup if its necessary.
@BeforeSuite
public void setup() {
    String env = PropertyManager.getProperty("env", "");
    if (!"".equals(env)) {
        PropertyManager.loadProperties("test_" + env + ".properties");
    }
}
10.5.3. What happens?
Testerra is loading the test.properties automatically at its initialization. Loading another property file will overwrite already existing values.
If you add your env property at the Gradle or Maven call, you can control the execution depending on the test environment.
gradle test -Denv=qa10.6. Project setup
Project setup recommendations.
10.7. Quality Assurance Attributes
As we know, things changing all the time. And in the context of a website, it may also change in several ways
-
Layout
-
Design
-
Features
10.7.1. Problem
The features of a website are covered by functional tests based on GuiElements. But GuiElements are using identifiers based on the Document Object Model (DOM) of the website. The DOM is based on HTML elements and can vary between static and highly dynamic. That means, if the layout or design changes, the DOM may also change and in consequence also the identifiers of the GuiElements which affects the functionality of the tests.
| Tests covering features may break if the layout or design changes. |
Layout Change → DOM Change → Identifier Change → GuiElement not working as expected
Changing identifiers carry the following additional risks:
-
False Negative: Tests failing, even if the feature is not broken
-
Sisyphus work: Test engineers must consistently update the identifiers
-
No coverage: The features and the tests are mostly out of sync.
10.7.2. Solution
To prevent these risks above, it’s a good practice to introduce a more stable form of identifiers based on the non-standard HTML @data-qa attribute.
-
These attributes are stable and don’t change, even if the DOM changes.
-
It enhances the DOM with more semantic features.
-
They don’t affected any other attributes like
@idor@class. -
They are independet of the underlaying framework like Bootstrap, Angular or whatsoever.
-
They can be easily removed in Live environments.
| Developers should integrate these attributes in their HTML code. |
10.7.3. Recommendation
We recommend a syntax, there the @data-qa tag contains 3 parts separated by slash (/) to describe it’s behaviour.
data-qa="[type]/[name]/[id?]"
Where name and id are free to define, type is not and should be one of these semantic types.
Semantics
Prefix |
Description |
Examples |
section |
Non-interactive area with content |
|
input |
Interactive input elements |
|
action |
Interative elements that performs an action |
|
Example
<ul>
    <li data-qa="section/animal/ape">
        <h1 data-qa="section/headline">Ape</h1>
        <p data-qa="section/description">Hairy and Goofy</p>
        <button data-qa="action/gotoDetails">Details</button>
    </li>
</ul>
You can select this item by using the Locate extension.
new GuiElement(driver, Locate.by().qa("section/animal/ape"));10.8. Always prefer Assertions
If you need to check several properties of a GuiElement, always prefer
-
Assertions due to the human-readable and precise description
-
over Waiters because of their fault tolerance
-
over Checks
// Good practice
element.asserts().assertText("Search results");
element.asserts().assertIsDisplayed();

// Bad practice
Assert.assertTrue(element.getText().contains("Search results"));

// Worse practice - could results in fails if page rendering isn't finished yet
Assert.assertTrue(element.isDisplayed());
11. Known issues
Because we depend on other frameworks and tools like TestNG and Selenium we may encounter issues that we want to fix, but are bound to releases and fixes in our dependencies.
Every known issue in our dependencies that will lead to an error, an unexpected or unsightly behaviour in Testerra framework will be documented here, as well as a solution or a workaround.
11.1. Issues with Selenium
11.1.1. Closing WebDriver sessions without using Testerra WebDriverManager
When closing WebDriver sessions without using Testerra WebDriverManager you will may encounter problems or some kind of unexpected issues, because the session is not marked as closed in Testerra WebDriverManager session store.
Therefore we always suggest to use WebDriverManager.shutdown() instead of WebDriverManager.getWebDriver().close().
12. Overview of all Testerra properties
Properties are managed by the PropertyManager
12.1. Testerra core properties
| Property | default | Description |
|---|---|---|
tt.system.settings.file |
system.properties |
File name of property file for proxy settings. |
tt.cert.trusted.hosts |
(empty) |
Whitespace separated list of trusted hosts (for SSL sockets) |
12.2. WebdriverManager properties
| Property | default | Description |
|---|---|---|
tt.browser.setting |
na. |
Define browser type and optional browser version as single string like
|
tt.browser |
na. |
Only defines the browser type, will be overwritten by tt.browser.setting. |
tt.browser.version |
na. |
Only defines the browser version, will be overwritten by tt.browser.setting. |
tt.baseurl |
na. |
URL of the first site called in a new browser session. |
tt.webdriver.mode |
remote |
Sets the webdriver mode. remote uses an external Selenium server |
tt.selenium.server.url |
na. |
The complete URL to a remote Selenium server. This setting overrides the following two properties. |
tt.selenium.server.host |
localhost |
The host name of the remote Selenium server. |
tt.selenium.server.port |
4444 |
The port of the remote Selenium server. |
tt.browser.maximize |
false |
Try to maximize the browser window. |
tt.browser.maximize.position |
self |
Screen position for the window to maximize. If you have several screens and want to maximize the window on another screen than your default screen, you can choose between (left, right, top or bottom) |
tt.window.size |
1920x1080 |
Default window size for all new sessions (when tt.browser.maximize is |
tt.display.resolution |
1920x1080 |
Deprecated by tt.window.size |
tt.wdm.closewindows.aftertestmethods |
true |
If true, after every test method all open browser windows are closed. |
tt.wdm.closewindows.onfailure |
true |
If true, after failed test methods all open browser windows are closed |
tt.wdm.timeouts.seconds.window.switch.duration |
5 |
Maximum duration to wait for on a |
webdriver.timeouts.seconds.pageload |
120 |
Defines the Selenium timeout for page load seconds. |
webdriver.timeouts.seconds.script |
120 |
Defines the Selenium timeout for execution of async scripts in seconds. |
12.3. PageFactory properties
| Property | default | Description |
|---|---|---|
tt.project.package |
eu.tsystems.mms.tic |
The package where the PageFactory searches for screen resolution specific subclasses. |
tt.page.factory.loops |
20 |
The loop detections prevents endless recursive creation of new page instances. This property defines the max count of loops. |
12.4. GuiElement properties
| Property | default | Description |
|---|---|---|
tt.element.timeout.seconds |
8 |
GuiElement timeout in seconds
|
tt.guielement.default.assertcollector |
false |
Sets the behavior of |
tt.guielement.use.js.alternatives |
true |
As a fallback of a click action Testerra tries a clickJS |
tt.guielement.checkrule |
|
Rule for Page objects validation of GuiElements |
tt.delay.after.guielement.find.millis |
0 |
Waits in milliseconds after a find to an GuiElement. |
tt.delay.after.guielement.action.millis |
0 |
Waits in milliseconds after an action on a GuiElement. |
tt.delay.before.guielement.action.millis |
0 |
Waits in milliseconds before an action on a GuiElement. |
12.5. Execution properties
| Property | default | Description |
|---|---|---|
tt.demomode |
false |
Visually marks every GuiElement that is being processed by click, type or assert. This may break layout checks. |
tt.dryrun |
false |
All testmethods are executed with ignoring all steps. Also all setup methods (before, after) are ignored. |
tt.list.tests |
false |
Lists all test methods in the current context without executing them. |
tt.on.state.testfailed.skip.shutdown |
false |
If true all browser sessions are left open. |
tt.on.state.testfailed.skip.following.tests |
false |
If true, all follwoing tests are skipped in case a test failed. |
tt.failed.tests.if.throwable.classes |
na. |
Failed tests condition: Throwable Class(~es, devided by ','). |
tt.failed.tests.if.throwable.messages |
na. |
Failed tests condition. Throwable Message(~s, devided by ','). |
tt.failed.tests.max.retries |
1 |
How often tests should be retried by the Testerra RetryAnalyzer. |
tt.reuse.dataprovider.driver.by.thread |
false |
Reuse existing Webdriver session for a thread of dataprovider. |
tt.execution.omit.indevelopment |
false |
If |
tt.watchdog.enable |
false |
Enables/Disables the |
tt.watchdog.timeout.seconds |
300 |
Sets the timeout in seconds after the |
tt.failure.corridor.active |
true |
Activate the failure corridor. |
tt.failure.corridor.allowed.failed.tests.high |
0 |
Number of test methods with weighting high allowed to fail to still mark the suite as passed. |
tt.failure.corridor.allowed.failed.tests.mid |
0 |
Number of test methods with weighting mid allowed to fail to still mark the suite as passed. |
tt.failure.corridor.allowed.failed.tests.low |
0 |
Number of test methods with weighting low allowed to fail to still mark the suite as passed. |
tt.perf.test |
false |
If true, activates performance test related behaviour sets default values for the performance test. |
tt.perf.page.thinktime.ms |
0 |
Sets a thinktime in ms for each page load. |
tt.perf.generate.statistics |
false |
If true, activates generation of graphs for the performance measurements. |
12.6. Report properties
| Property | default | Description |
|---|---|---|
tt.report.dir |
/target/surefire-reports/report/ |
Creates the report in the specified directory below the working directory. |
tt.report.name |
na. |
Names the report (e.g. the project where Testerra is used) |
tt.runcfg |
na. |
Set a run configuration to use different variations (test sets) of a test scope within a build task. |
tt.screenshotter.active |
true |
If true, screenshots are fetched and added to the report. |
tt.report.screenshots.preview |
true |
If true a screenshots preview is added to the test methods in the report |
tt.screenshot.on.pageload |
false |
If true, screenshot after page is loaded will be taken |
tt.screencaster.active |
true |
If true, all screencasts are fetchted and added to the report depending on the enabled test method states by tt.screencaster.active.on.failed and tt.screencaster.active.on.success. |
tt.screencaster.active.on.failed |
true |
If true, all screencasts for failed tests are fetched and added to the report. |
tt.screencaster.active.on.success |
false |
If true, all screencasts for successful tests are fetched and added to the report. |
tt.report.activate.sources |
true |
If true, adds source information to report |
tt.module.source.root |
src |
Root directory for searching source info. |
tt.source.lines.prefetch |
5 |
Amount of lines taken into account before the actual error occurred (print lines between error line and error line minus tt.source.lines.prefetch) |
12.7. Layout Check properties
| Property | default | Description |
|---|---|---|
tt.layoutcheck.reference.path |
|
Path where the reference screenshots where saved |
tt.layoutcheck.reference.nametemplate |
|
Prefix for ReferenceScreenshots |
tt.layoutcheck.takereference |
false |
Determines whether reference images where taken in the current run |
tt.layoutcheck.use.ignore.color |
false |
Specifies whether the upper left pixel in the reference image defines an "ignore color". If true, then every pixel with this color will be ignored during the later comparison. |
tt.layoutcheck.use.area.color |
false |
Specifies whether the upper left pixel in the reference image defines an "area color". If true, then every area surrounded by pixels with this color will be used for later comparison, other areas are dismissed. Opposite of tt.layoutcheck.use.ignore.color. |
tt.layoutcheck.actual.nametemplate |
|
Filename scheme for saving current screenshots. The value must contain a '%s' which is replaced by the specified target file name during test execution. |
tt.layoutcheck.distance.nametemplate |
|
Filename scheme for saving distance images. The value must contain a '%s' which is replaced by the specified target file name during test execution. |
tt.layoutcheck.distance.path |
|
Directory path under which the calculated distance images are stored. |
tt.layoutcheck.actual.path |
|
Directory path under which the current screenshots for the comparison are saved |
tt.layoutcheck.match.threshold |
0 |
Max allowed difference in rgb values between actual and reference image in percentage. If R, G, and B percentages are higher than tt.layoutcheck.match.threshold the corresponding pixel is marked as false (=red color in distance image) |
tt.layoutcheck.match.threshold |
0.95d |
Defines at which score a region is considered a match. Should be as high as possible and as low as needed. |
tt.layoutcheck.displacement.threshold |
5 |
Displacement distance of matches that is considered as error (when distance > tt.layoutcheck.displacement.threshold) |
tt.layoutcheck.intra.grouping.threshold |
5 |
Threshold for grouping movement errors (errors ⇐ tt.layoutcheck.intra.grouping.threshold are grouped) |
tt.layoutcheck.min.match.distance |
5 |
Max distance for grouping multiple matches as single match (distance of matches < tt.layoutcheck.min.match.distance are marked as single match) |
tt.layoutcheck.min.size.difference.sub.images |
10 |
Minimal difference in size of the reference and actual image, to consider the reference image as sub image. |
tt.layoutcheck.distance.multiple.matches |
14 |
Max distance between matches until a warning message about the parameter setting is logged. (matches have distance < tt.layoutcheck.distance.multiple.matches a warning is logged) |
tt.layoutcheck.ignore.ambiguous.movement |
- |
when true ignore ambiguous movement, which means for a template, several matches were found at different positions and it is unclear to which match the template belongs to. |
tt.layoutcheck.ignore.movement |
- |
when true ignore movement, which mean exactly one match was found for a template, but it is in the wrong position. |
tt.layoutcheck.ignore.group.movement |
false |
when true ignore group movement, which means for a set of templates, displacement errors have been found which have the same displacement vector. |
tt.layoutcheck.ignore.missing.elements |
- |
when true ignore missing elements, which mean no match was found for a template. |
tt.layoutcheck.ignore.ambiguous.match |
- |
when true ignore ambiguous match, which means several templates have been matched to this position, but only one template can be correct. |
Architecture